Telegram Channel Guide
Last updated: April 17, 2026
This guide will help you connect Telegram with QClaw. Unlike WhatsApp and WeChat, Telegram requires you to create a Bot via BotFather first, then paste the Bot Token into QClaw to complete the connection.
Prerequisites
- QClaw is installed on your computer
- You have a Telegram account
Setup Guide
Overview
Open QClaw Settings → Channels → click Telegram Configure → you’ll see it needs a Bot Token → go to Telegram and create a bot via BotFather → copy the Token → paste it back into QClaw → click Connect.
1Open QClaw Telegram Settings
Launch QClaw on your computer. Click Settings → Channels, find Telegram and click Configure. A dialog will appear asking for a Telegram Bot Token. You’ll need to create a bot in Telegram to get this token — follow the next steps.

2Search for BotFather in Telegram
Open Telegram on your phone or desktop. In the search bar, type BotFather and find the official account (verified with a blue checkmark ✓). Tap Open to start a conversation.

3Create a New Bot & Get the Token
In the BotFather chat, send the command:
/newbot
BotFather will ask you a few questions:
- Bot name: Choose a display name for your bot (e.g.
QClaw) - Bot username: Choose a unique username that ends with
_bot(e.g.YourNameQClaw_bot)
Once created, BotFather will reply with a message containing your Bot Token — a long string like 1234567890:AAF.... Copy this token.

4Paste the Token & Connect
Go back to the QClaw Telegram dialog from Step 1. Paste the Bot Token you just copied into the Telegram Bot Token field, then click Connect.
5Start Chatting
Once connected, go back to the BotFather conversation in Telegram. Click the bot link in BotFather’s reply (e.g. t.me/YourNameQClaw_bot). Tap Start and send a message — QClaw will process it on your computer and reply directly in the chat.
Troubleshooting
- Bot not responding? — Make sure QClaw is running on your computer and the Bot Token was pasted correctly.
- Invalid token error? — Go back to BotFather and copy the token again. Make sure there are no extra spaces.
- Want to change the bot name later? — Send
/setnameto BotFather to update the display name, or/setuserpicto set a profile picture.
Discord Integration Guide
Last updated: May 8, 2026
This guide will help you connect QClaw to Discord, so you can control QClaw and receive responses directly through Discord messages.
Prerequisites
Before getting started, make sure you have:
- QClaw installed on your computer
- A Discord account
- A Discord server where you have Administrator or Manage Server permissions (required to add bots)
If you don't have a Discord server, you can create one for free. Open Discord, click the + icon on the left sidebar, and select Create My Own.
-----------------------------------------
Setup Flow
Overall Process
Create a Discord Application & Bot -> Get the Bot Token -> Invite the Bot to Your Server -> Configure QClaw
-----------------------------------------
Detailed Steps:
Step 1: Create a Discord Application
- Go to the Discord Developer Portal and log in with your Discord account.
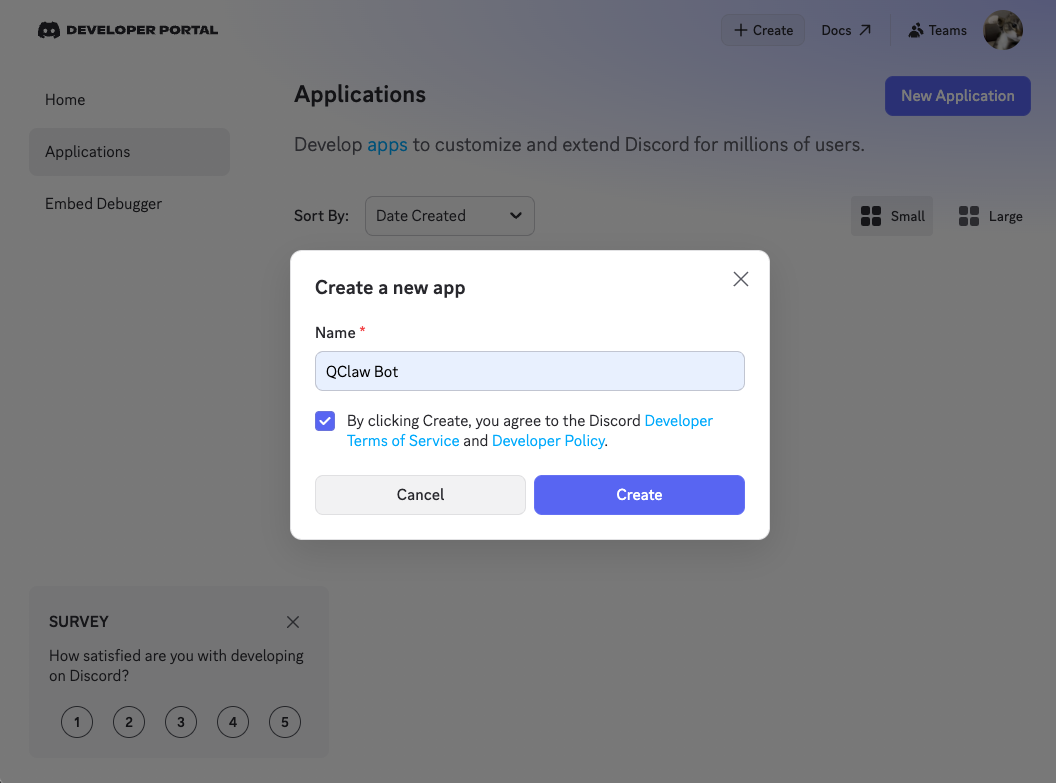
- Click "New Application" in the top-right corner.
- Enter a name for your application (e.g., QClaw Bot) and click "Create".
This name will be visible to other members of your server when they interact with the bot, so choose something recognizable.
- (Optional) Upload an icon and add a description for your bot on the General Information page.
-----------------------------------------
Step 2: Get the Bot Token
- In the left sidebar, click "Bot".
- Scroll down to the Privileged Gateway Intents section and enable permissions
- On the Bot page, click "Reset Token" (or "Copy" if a token is already shown).
Security Notice: Keep your bot token private. Anyone with this token can control your bot. Do not share it or commit it to public repositories.
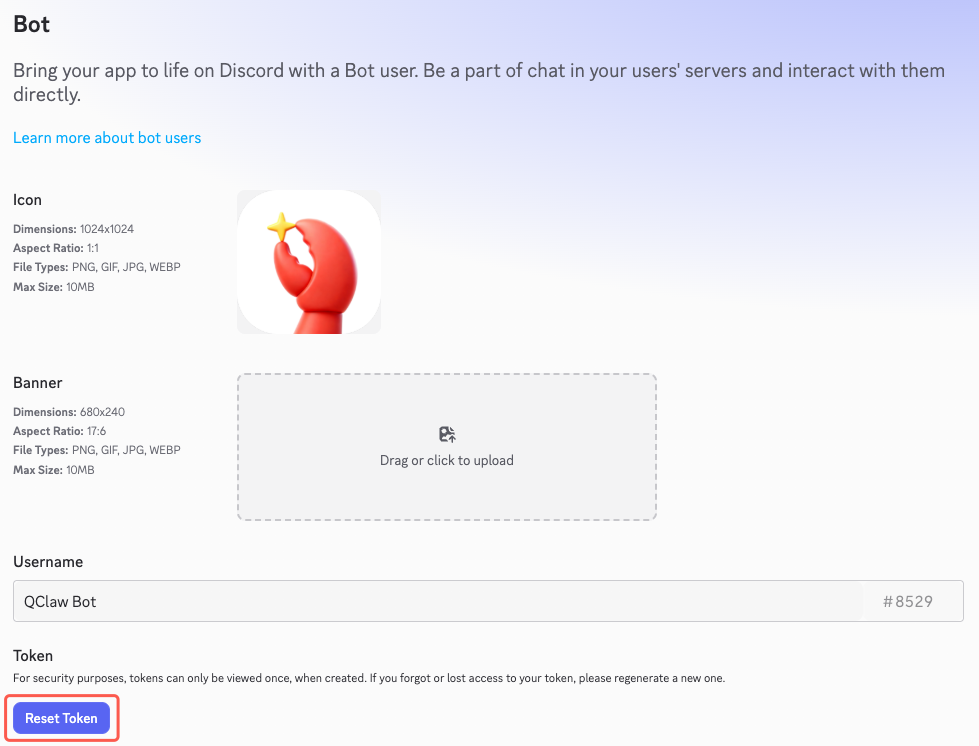
- Save this token, you will need it when configuring QClaw.
-----------------------------------------
Step 3: Set Bot Permissions
- In the left sidebar, click "OAuth2"
- Under Scopes, check "bot"
- Under Bot Permissions, check:
- Send Messages
- Read Message History
- View Channels
- Manage Threads
- Attach Files
- any other permission you want
- Copy the generated OAuth2 URL at the bottom of the page.
-----------------------------------------
Step 4: Invite the Bot to Your Server
- Open the generated URL from Step 3 in your browser.
- Select the Discord server you want to add the bot to, then click "Authorize".
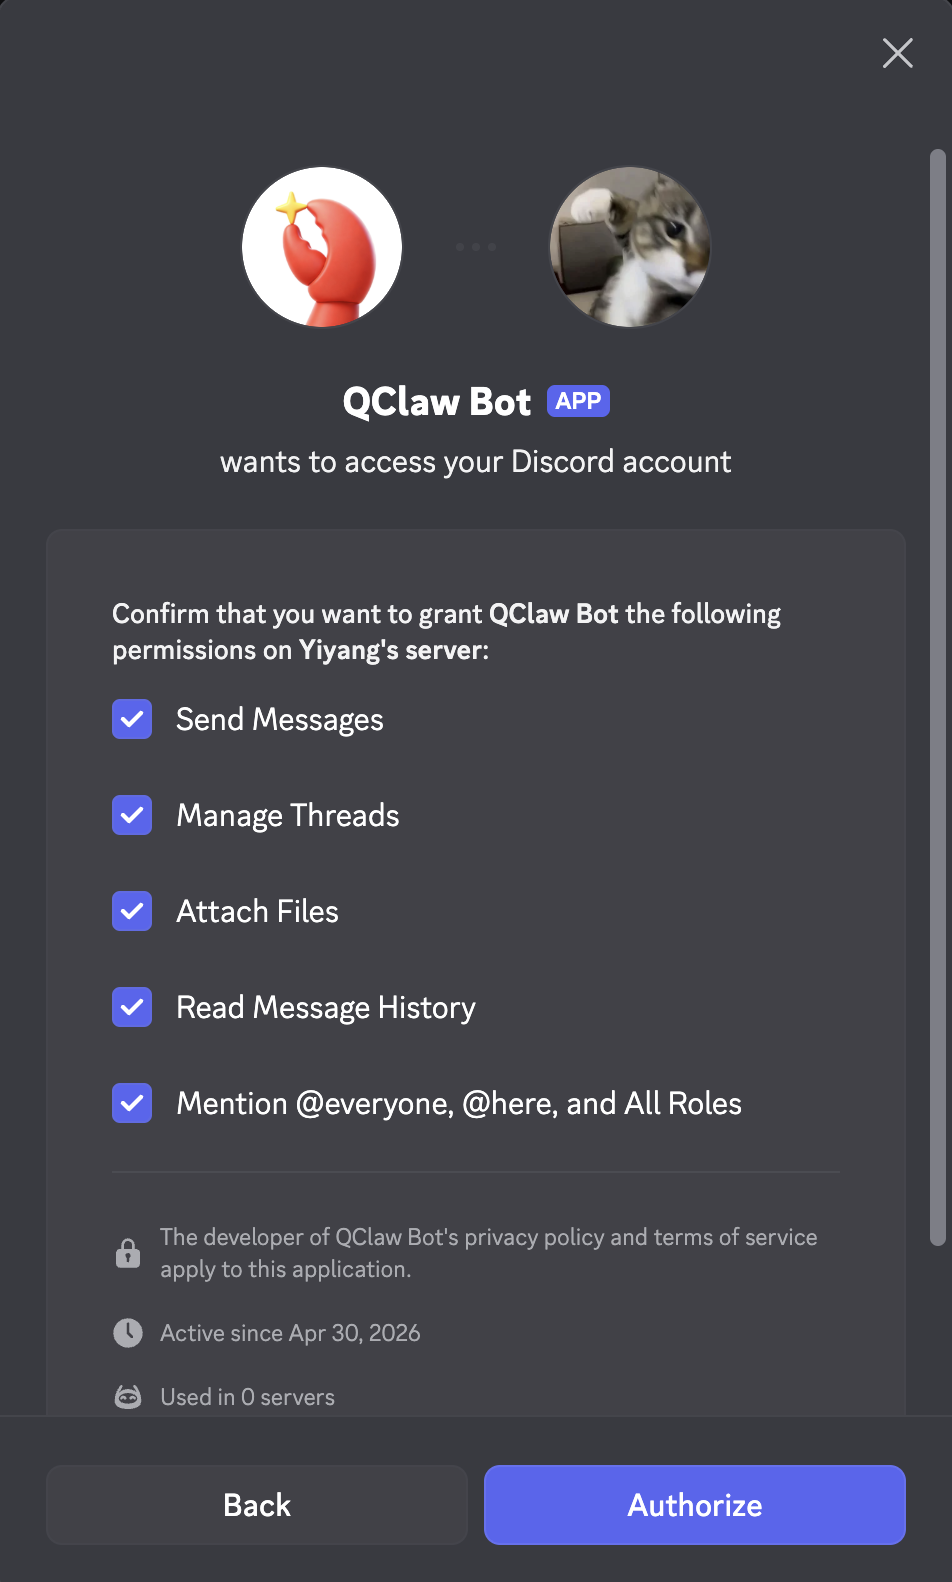
- Open Discord — your bot should now appear in the member list of your server
-----------------------------------------
Step 5: Configure QClaw
- Open QClaw on your computer.
- Click the Channels button in the bottom-left corner.
- Select "Discord" from the list of platforms, then click "Configure".
- Paste the Bot Token you copied in Step 3 into the token field.
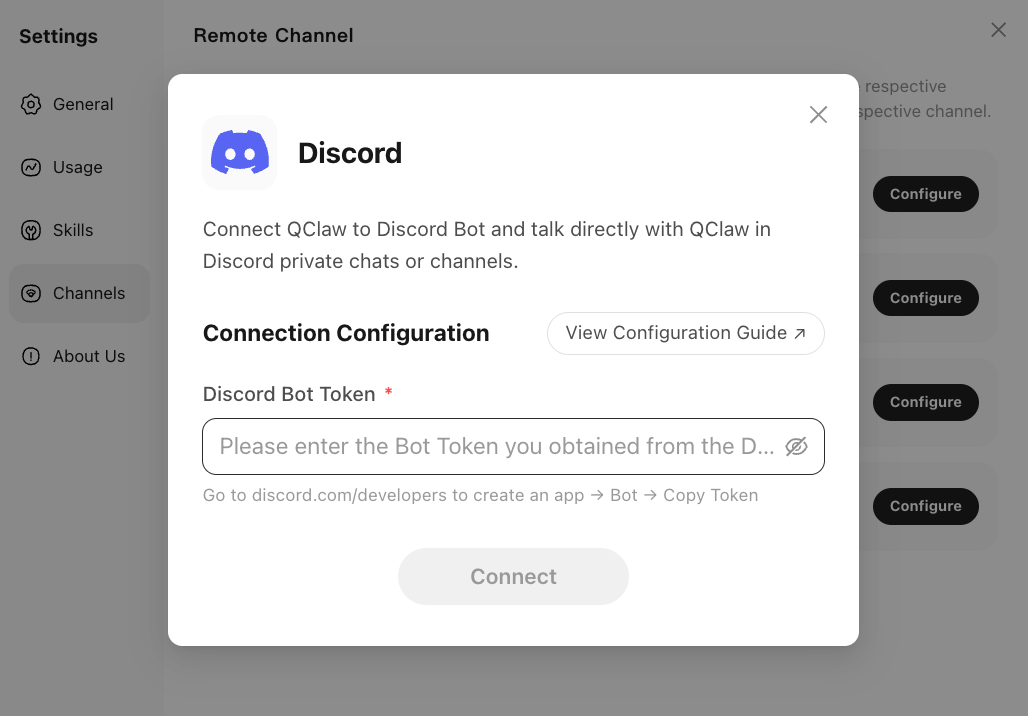
- Click "Connect" to complete the setup.
- Now, you have Discord Connected to your QClaw
-----------------------------------------
Start Using
QClaw on Discord supports two usage modes: Direct Message (DM) and Server Channel.
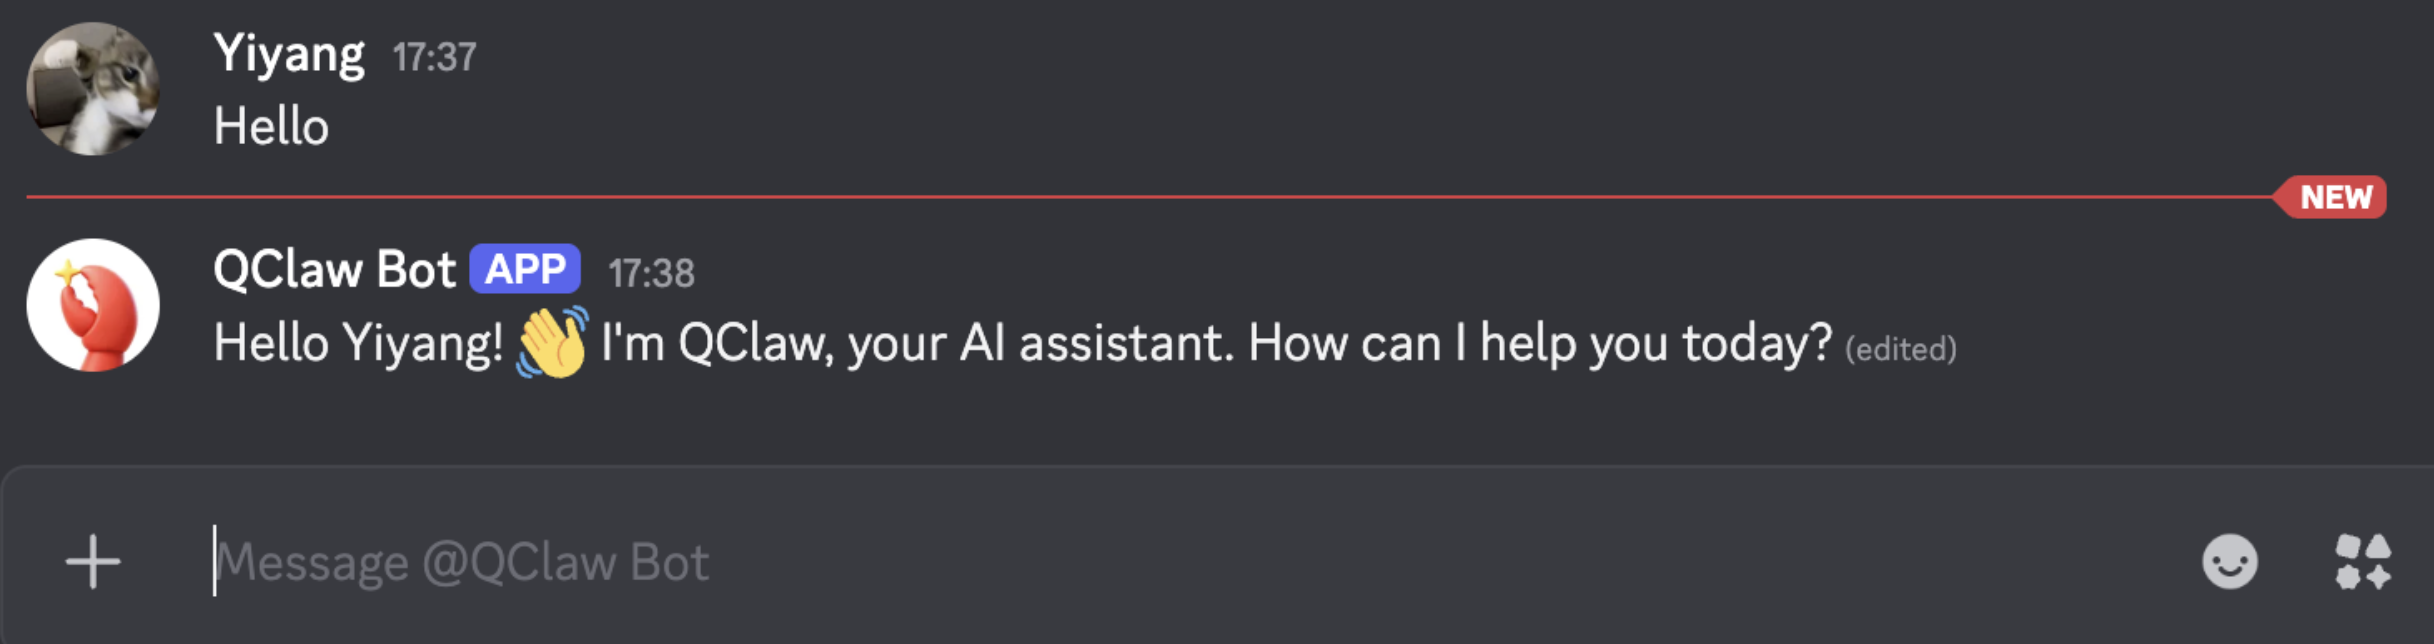
- Direct Message (DM): Open Discord and find your bot in your Direct Messages list. Send it a message — for example, "Hello" — to test the connection. If configured correctly, QClaw will receive the message and reply in Discord.
- Server Channel: Go to any text channel in your server where the bot has been granted access. Mention the bot using @BotName followed by your message. If configured correctly, QClaw will receive the mention and reply in the channel.
For example: @QClaw Bot Hello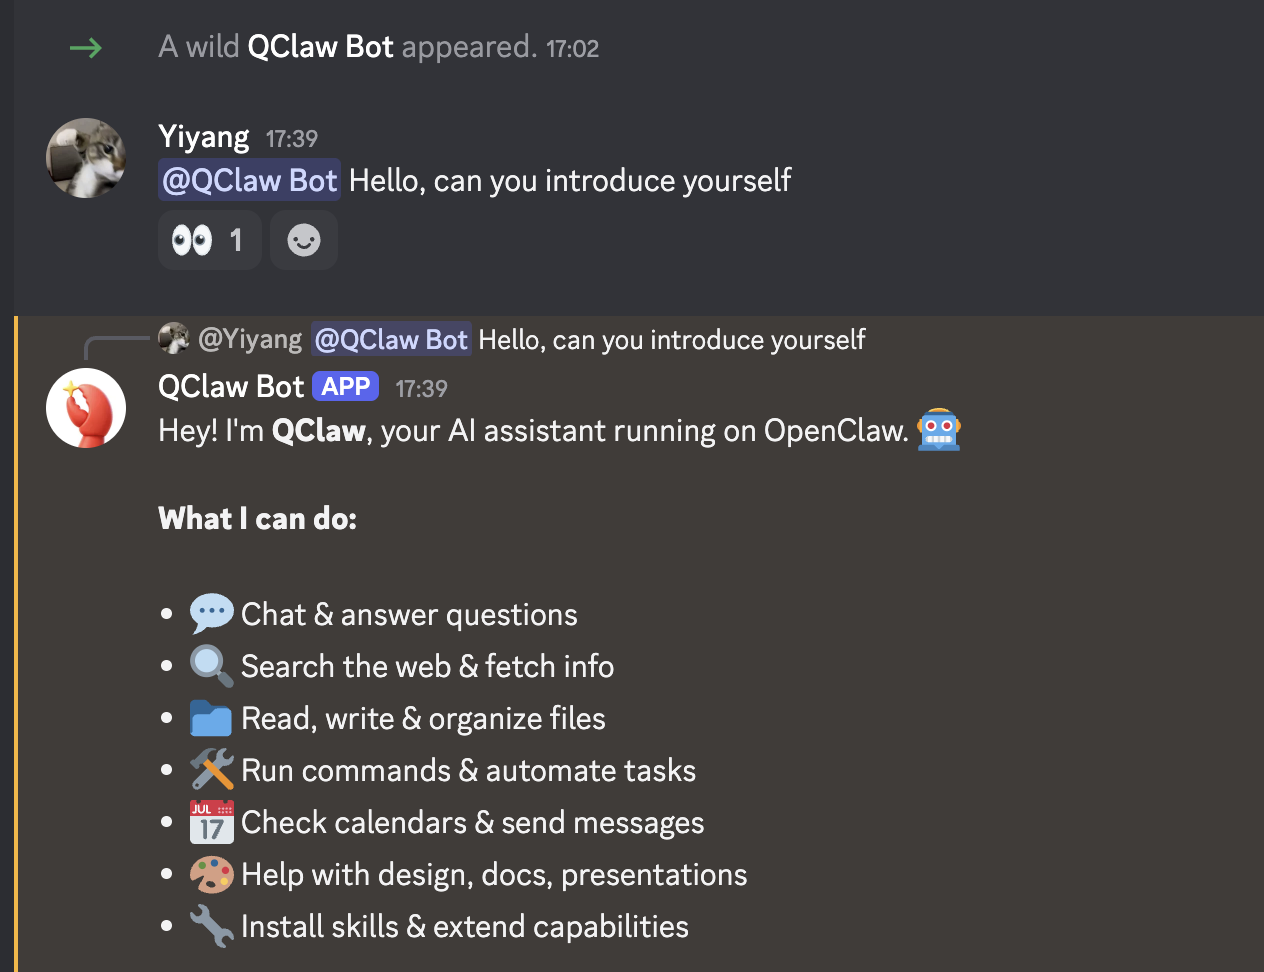
If the bot replies successfully, you have completed the QClaw–Discord integration! 🎉
-----------------------------------------
Frequently Asked Questions
- The bot doesn't respond — what should I check?
- Check your bot token: Make sure the token pasted in QClaw is correct and hasn't been reset. If you reset the token in the Developer Portal, you need to update it in QClaw as well.
- Check QClaw is running: The bot only works when QClaw is actively running on your computer.
- Check channel permissions: Make sure the bot has View Channel and Send Messages permissions in the channel you're using.
- The bot appears offline in my server — what's wrong?
- This usually means QClaw is not running, or the bot token in QClaw is incorrect. Check that QClaw is open on your computer and that the token matches the one in the Discord Developer Portal.
- The bot can't see my messages — what should I do?
- Make sure Message Content Intent is enabled under Bot → Privileged Gateway Intents in the Discord Developer Portal. Without this, the bot cannot read message content in servers.
© 2026 Tencent. All rights reserved.
Slack Integration Guide
Last updated: May 8, 2026
This guide will help you connect QClaw to Slack, so you can control QClaw and receive responses directly through Slack messages.
Prerequisites
Before getting started, make sure you have:
- QClaw installed on your computer
- A Slack account
- A Slack workspace where you have permissions to install apps (Admin approval may be required depending on your workspace settings)
If you don't have a Slack workspace, you can create one for free at slack.com. Click "Create a new workspace" and follow the setup instructions.
-----------------------------------------
Setup Flow
Overall Process
Create a Slack App -> Get the Bot Token -> Invite the App to Your Workspace -> Configure QClaw
-----------------------------------------
Detailed Steps:
Step 1: Create a Slack App
- Go to the Slack API Portal and log in with your Slack account.
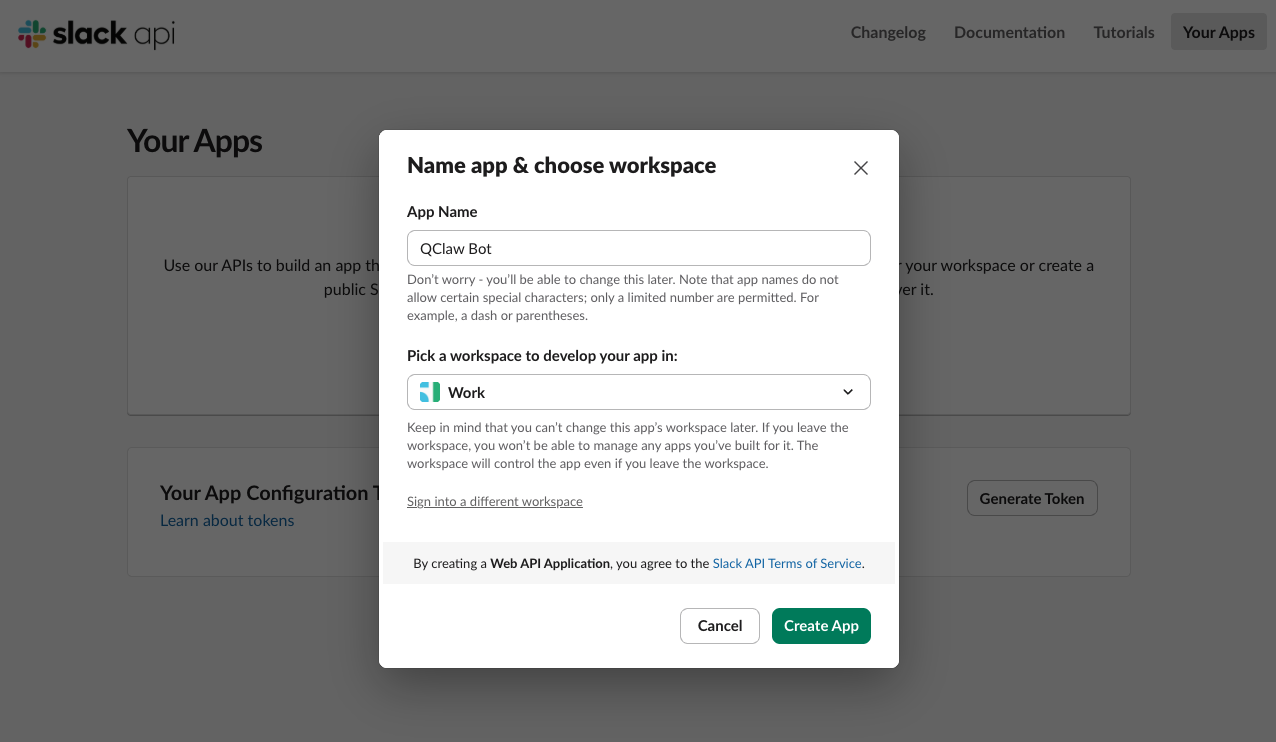
- Click "Create New App" on the page.
- Select "From Scratch" in the dialog that appears.
- Enter a name for your app (e.g., QClaw Bot) and click select the Slack workspace you want to use, then click "Create App".
This name will be visible to other members of your workspace when they interact with the bot, so choose something recognizable.
- (Optional) Upload an icon and add a description for your app under Basic Information page.
-----------------------------------------
Step 2: Get the Bot Token
- In the left sidebar, click "OAuth & Permissions".
- Scroll down to the Scope section and under Bot Token Scopes, click "Add an OAuth Scope". Add the following scopes:
- chat:write
- im:history
- im:read
- channels:history
- channels:read
- app_mentions:read
- any other permission you want
- Scroll back to the top of the OAuth & Permissions page and click "Install to Work", then click "Allow" to authorize.
Security Notice: Keep your bot token private. Anyone with this token can control your bot. Do not share it or commit it to public repositories.
- Get Bot User OAuth Token(it starts with xoxb-) on OAuth & Permissions Page
- Save this token, you will need it when configuring QClaw.
-----------------------------------------
Step 3: Enable Event Subscriptions
- In the left sidebar, click "Event Subscriptions" and toggle Enable Events to On.
- Under Subscribe to bot events, click "Add Bot User Event" and add:
- meesage.im
- app_mention
- message.channels (optional, for public channel messages)
- any other permission you want
- Click "Save Changes".
-----------------------------------------
Step 4: Get App Level Tokens
- In the left sidebar, click "Basic Informtion" and scroll down to App-Level Tokens.
- Click "Generate Token and Scopes" and "Add Scope" select:
- connections:write
- Click "Generate" and copy your App-Level Token which would be used in following configuration.
-----------------------------------------
Step 5: Configure QClaw
- Open QClaw on your computer.
- Click the Channels button in the bottom-left corner.
- Select "Slack" from the list of platforms, then click "Configure".
- Paste the Bot Token & the App-Level Token you copied in previous steps into the token field.
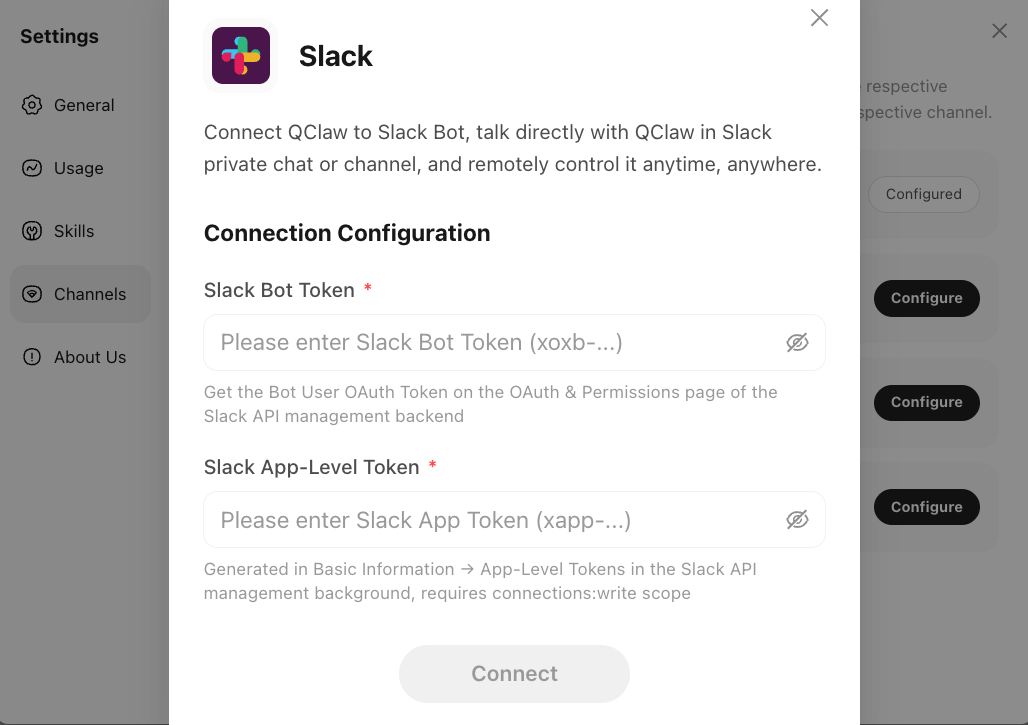
- Click "Connect" to complete the setup.
- Now, you have Slack Connected to your QClaw
-----------------------------------------
Start Using
QClaw on Slack supports two usage modes: Direct Message (DM) and Channel.
- Direct Message (DM): Open Slack and find your bot in your Direct Messages in the left side bar. Send it a message, for example, "Hello", to test the connection. If configured correctly, QClaw will receive the message and reply in Slack.
- Channel: Go to any channel in your workspace where the bot has been added. Mention the bot using @BotName followed by your message. If configured correctly, QClaw will receive the mention and reply in the channel.
If the bot replies successfully, you have completed the QClaw–Slack integration! 🎉
-----------------------------------------
Frequently Asked Questions
- The bot doesn't respond — what should I check?
- Check your bot token: Make sure the token pasted in QClaw is correct and hasn't been regenerated. If you reinstall the app in the Slack API Portal, a new token is issued and you'll need to update it in QClaw.
- Check QClaw is running: The bot only works when QClaw is actively running on your computer.Check channel permissions: Make sure the bot has been added to the channel and has the correct OAuth scopes enabled.
- The bot appears offline in my workspace — what's wrong?
- This usually means QClaw is not running, or the bot token in QClaw is incorrect. Check that QClaw is open on your computer and that the token matches the one shown in the Slack API Portal under OAuth & Permissions.
© 2026 Tencent. All rights reserved.
Evolution of the QClaw Experience: Transitioning from WhatsApp
Last updated: April 30, 2026
At QClaw, our mission has always been to provide seamless, intelligent assistance wherever you are. To ensure we continue delivering the highest standards of performance, security, and feature richness, we are transitioning away from WhatsApp as a supported channel, starting April 30, 2026.
This decision follows recent changes to third-party terms of service and platform policies. To ensure we provide a secure, reliable experience that aligns with these updated requirements, we are focusing our efforts on our core platforms.
Your account and data remain fully intact. You can continue your conversations and access all features seamlessly via the QClaw Desktop portal.
Looking Ahead
We understand that many of you enjoyed the convenience of WhatsApp. This decision was not made lightly, but it is a necessary step in evolving QClaw from a simple chatbot into a comprehensive AI partner. By focusing on our primary platforms, we can ship updates faster, protect your data better, and build the features you’ve been asking for.
Thank you for being a part of the QClaw community, your trust and support are what drive us forward. We look forward to continuing this journey together on our core platforms.
The QClaw Team
WeChat Channel Guide
Last updated: April 17, 2026
This guide will help you connect WeChat with QClaw, so you can interact with your AI lobster directly through WeChat messages.
Prerequisites
- QClaw is installed on your computer
- You have a WeChat account
Setup Guide
Overview
Open QClaw Settings → click Channels → find WeChat and click Configure → scan the QR code with WeChat → confirm the connection on your phone.
1Open Settings & Scan the QR Code
Launch QClaw on your computer. Click the Settings icon, then select Channels from the left menu. Find WeChat and click Configure. A dialog will pop up displaying a QR code. Open WeChat on your phone, tap the “+” icon in the top-right corner, then tap Scan, and scan this QR code.

2Authorize the Connection
After scanning, your phone will show a page titled “Connect OpenClaw to Weixin”, explaining that the WeixinClawBot plug-in will be enabled after connection. Tap the green Connect button at the bottom to authorize.

3Start Chatting
Once authorized, you’ll be taken to the WeixinClawBot chat screen. This is your QClaw AI assistant — send it messages just like texting a friend. Ask it to organize files, send emails, set reminders, or anything else QClaw can do.

Optional: To rename the bot, tap the settings icon (⚙️ top-right of the chat), then edit the nickname for easier identification.
Troubleshooting
- QR code expired? — Close the dialog and click Configure again to generate a new QR code.
- Can’t find QClaw in WeChat contacts? — Search for “WeixinClawBot” in your WeChat contacts. It may take a moment to appear after authorization.
- Messages not being processed? — Make sure QClaw is running on your computer. The AI processes tasks locally on your machine.
WeCom Channel Guide
Last updated: April 17, 2026
This guide will help you connect WeCom (Enterprise WeChat) with QClaw. You’ll need to create a Smart Robot in WeCom and obtain the Bot ID and Secret, then enter them into QClaw to complete the connection.
Prerequisites
- QClaw is installed on your computer
- WeCom desktop client is installed and up to date
- You have a WeCom account with permission to create Smart Robots
Step 1: Create a Smart Robot in WeCom
1Open WeCom Workspace
Open WeCom on your desktop. Navigate to Workspace and find the Smart Robot application.

2Create a New Robot
In the Smart Robot page, click the Create robot button. A dialog will appear — click Manual Creation at the bottom to proceed with manual setup.


3Switch to API Mode
You’ll see a robot creation form. At the bottom, click Switch to API Mode. This mode allows QClaw to communicate with the robot via API.

4Configure API & Get Bot ID and Secret
In API mode:
- Set a name for your bot (e.g. “QClaw”)
- Under Allowed Members, click Edit to select the team members who should have access
- For Connection Method, select WebSocket Long Connection
- Copy the Bot ID shown on the page
- Click Click to Get next to Secret to generate and copy the Secret
- Click Save to finish

Step 2: Connect WeCom to QClaw
5Open QClaw Channel Settings
On your computer, open QClaw. Click Settings → Channels and find WeCom. Click Configure.

6Enter Bot ID and Secret
In the WeCom configuration dialog, select WebSocket long connection mode. Paste the Bot ID and Secret you obtained from WeCom, then click Connect.

Step 3: Test the Connection
7Start Chatting
In WeCom, go to Contacts → Smart Robots and find the bot you just created. Click Send Message and send a simple test message (e.g. “Hello”). If configured correctly, QClaw will receive the message and reply.
Troubleshooting
- Bot not responding? — Make sure QClaw is running on your computer. Check that both WeCom and QClaw are set to “WebSocket Long Connection” mode.
- Long connection registration failed? — Re-copy the Bot ID and Secret without extra spaces. If the Secret has expired, regenerate it in WeCom.
- Can’t find Smart Robot in Workspace? — Upgrade your WeCom client to the latest version.
QQ Channel Guide
Last updated: April 17, 2026
This guide will help you connect QQ with QClaw. You’ll need to create a QQ Bot on the QQ Open Platform and obtain the AppID and AppSecret, then enter them into QClaw to complete the connection.
Prerequisites
- QClaw is installed on your computer
- You have a QQ account with verified real-name authentication
Step 1: Create a QQ Bot & Get AppID and AppSecret
1Visit the QQ Open Platform
Go to the QQ Open Platform (q.qq.com). Click the “Lobster entrance” button and log in with your QQ account.

2Start the Quick Setup
After logging in, you’ll see the Quick Start Guide page. Follow the 4 steps: QQ account login → Create a QQ bot → Configure the access key → Open QQ to start a conversation.

3Create a Bot
In the My robot section, click the Create button. Fill in a name for your bot (e.g. “QClaw”). You can create up to 5 bots.

4Copy AppID and AppSecret
Once the bot is created, you’ll see the bot details page with the AppID and AppSecret. Copy both values — you’ll need them to configure QClaw.

Step 2: Connect QQ Bot to QClaw
5Open QClaw Channel Settings
On your computer, open QClaw. Click Settings → Channels and find QQ. Click Configure.

6Enter AppID and AppSecret
In the QQ configuration dialog, enter the QQ Bot App ID and QQ Robot App Secret you copied earlier, then click Connect.

Step 3: Test the Connection
7Start Chatting
Open QQ and find the bot you just created in your contact list. Send a simple test message (e.g. “Hello”). If configured correctly, QClaw will receive the message and reply directly in QQ.
Troubleshooting
- Bot not responding? — Make sure QClaw is running on your computer. Double-check the AppID and AppSecret.
- AppSecret expired? — Go back to the QQ Open Platform to regenerate a new AppSecret.
- Can’t create a bot? — Make sure your QQ account has completed real-name authentication.
Feishu (Lark) Channel Guide
Last updated: April 17, 2026
This guide will help you connect Feishu (Lark) with QClaw. You can choose between One-Click Creation (recommended) or Manual Configuration.
Prerequisites
- QClaw is installed on your computer
- You have a Feishu enterprise account with permission to create apps
Option A: One-Click Creation (Recommended)
1Create a Feishu Bot Instantly
Visit the Feishu Open Platform — Create OpenClaw Bot. Enter a name for your bot (e.g. “QClaw”), select an avatar, and click Create. The platform will automatically configure all necessary settings.

2Copy App ID and App Secret
After creation, you’ll see a success page with the App ID and App Secret. Click Copy App ID and Copy App Secret to save them. Then proceed to Step 2: Connect to QClaw below.

Option B: Manual Configuration
1Create an Enterprise App
Log in to the Feishu Open Platform. Click “Create Enterprise App”.

Fill in the app name (e.g. “QClaw”), description, and select an icon. Click Create.

2Add Bot Capability
In the app details page, click “Add App Capability” in the left menu. Find the Bot card and click + Add.

3Configure Permissions
In the left menu, click Permission Management. Click “Batch Import / Export”.

Clear the input box and paste the following JSON, then click “Next, confirm new permissions”:
{
  "scopes": {
    "tenant": [
      "contact:contact.base:readonly", "docx:document:readonly",
      "im:chat:read", "im:chat:update",
      "im:message.group_at_msg:readonly", "im:message.p2p_msg:readonly",
      "im:message.pins:read", "im:message.pins:write_only",
      "im:message.reactions:read", "im:message.reactions:write_only",
      "im:message:readonly", "im:message:recall",
      "im:message:send_as_bot", "im:message:send_multi_users",
      "im:message:send_sys_msg", "im:message:update", "im:resource",
      "application:application:self_manage",
      "cardkit:card:write", "cardkit:card:read"
    ],
    "user": [
      "contact:user.employee_id:readonly", "offline_access",
      "base:app:copy", "base:field:create", "base:field:delete",
      "base:field:read", "base:field:update",
      "base:record:create", "base:record:delete",
      "base:record:retrieve", "base:record:update",
      "base:table:create", "base:table:delete",
      "base:table:read", "base:table:update",
      "base:view:read", "base:view:write_only",
      "base:app:create", "base:app:update", "base:app:read",
      "board:whiteboard:node:create", "board:whiteboard:node:read",
      "calendar:calendar:read", "calendar:calendar.event:create",
      "calendar:calendar.event:delete", "calendar:calendar.event:read",
      "calendar:calendar.event:reply", "calendar:calendar.event:update",
      "calendar:calendar.free_busy:read",
      "contact:contact.base:readonly", "contact:user.base:readonly",
      "contact:user:search",
      "docs:document.comment:create", "docs:document.comment:read",
      "docs:document.comment:update", "docs:document.media:download",
      "docs:document:copy",
      "docx:document:create", "docx:document:readonly",
      "docx:document:write_only",
      "drive:drive.metadata:readonly", "drive:file:download",
      "drive:file:upload",
      "im:chat.members:read", "im:chat:read", "im:message",
      "im:message.group_msg:get_as_user",
      "im:message.p2p_msg:get_as_user", "im:message:readonly",
      "search:docs:read", "search:message",
      "space:document:delete", "space:document:move",
      "space:document:retrieve",
      "task:comment:read", "task:comment:write",
      "task:task:read", "task:task:write", "task:task:writeonly",
      "task:tasklist:read", "task:tasklist:write",
      "wiki:node:copy", "wiki:node:create", "wiki:node:move",
      "wiki:node:read", "wiki:node:retrieve",
      "wiki:space:read", "wiki:space:retrieve", "wiki:space:write_only"
    ]
  }
}
Review the permissions and click “Apply”. For data scope configuration, click Confirm.

4Copy App ID and App Secret
In the left menu, click “Credentials & Basic Info”. Copy the App ID and App Secret.
Step 2: Connect Feishu to QClaw
5Open QClaw Channel Settings
On your computer, open QClaw. Click Settings → Channels and find Lark. Click Configure.

6Enter App ID and App Secret
In the Lark configuration dialog, enter the Lark App ID and Lark App Secret you copied, then click Connect.

Step 3: Publish the App on Feishu
7Configure Event Callbacks
Go back to your app on the Feishu Open Platform. In the left menu, click “Events & Callbacks”.
- Click the edit button next to subscription method. Select “Use Long Connection to receive events” and save.
- In the Event Configuration section, click Add Event. Search for and add “Receive Message”.
- Switch to the Callback Configuration tab. Click Add Callback. Search for and add “Card Callback Interaction”.
8Create & Publish a Version
Click the “Create Version” button at the top of the page. Fill in a version number (e.g. 1.0.0) and description, then click Confirm. The app must be published before it can be used in Feishu.
9Start Chatting
Once published, the Developer Assistant in Feishu will notify you. Search for your bot’s name in Feishu and start a conversation. Send a test message (e.g. “Hello”) to verify the connection.
Troubleshooting
- Bot not responding? — Make sure the app has been published on Feishu and QClaw is running on your computer.
- Not receiving messages? — Verify that you’ve added the “Receive Message” event and “Card Callback Interaction” callback.
- Permission JSON format error? — Make sure you created an “Enterprise App”, not a “Store App”.
- Enterprise admin approval required? — If using an enterprise account, contact your admin to approve the app.
DingTalk Channel Guide
Last updated: April 17, 2026
This guide will help you connect DingTalk with QClaw. You can choose between One-Click Creation (recommended) or Manual Configuration. Both require you to obtain a Client ID and Client Secret from the DingTalk Open Platform.
Prerequisites
- QClaw is installed on your computer
- You have a DingTalk account that belongs to an organization / team
- Your account has developer permissions in that organization
Option A: One-Click Creation (Recommended)
1Log in to the Developer Console
Go to the DingTalk Developer Console. Log in and select your organization. Under App Development, click Create Now to one-click create an OpenClaw bot.
2Configure and Create
Fill in the bot name, description, and icon (or use defaults), then click Confirm. The platform will automatically configure the required permissions (Card.Streaming.Write, Card.Instance.Write, qyapi_robot_sendmsg).
3Copy Client ID and Client Secret
After creation, the platform will display the Client ID and Client Secret. Copy both values and proceed to Step 2: Connect to QClaw below.
Option B: Manual Configuration
1Open the DingTalk Open Platform
Go to open.dingtalk.com. Click Developer Console in the top-right corner. Select the organization you want to use.


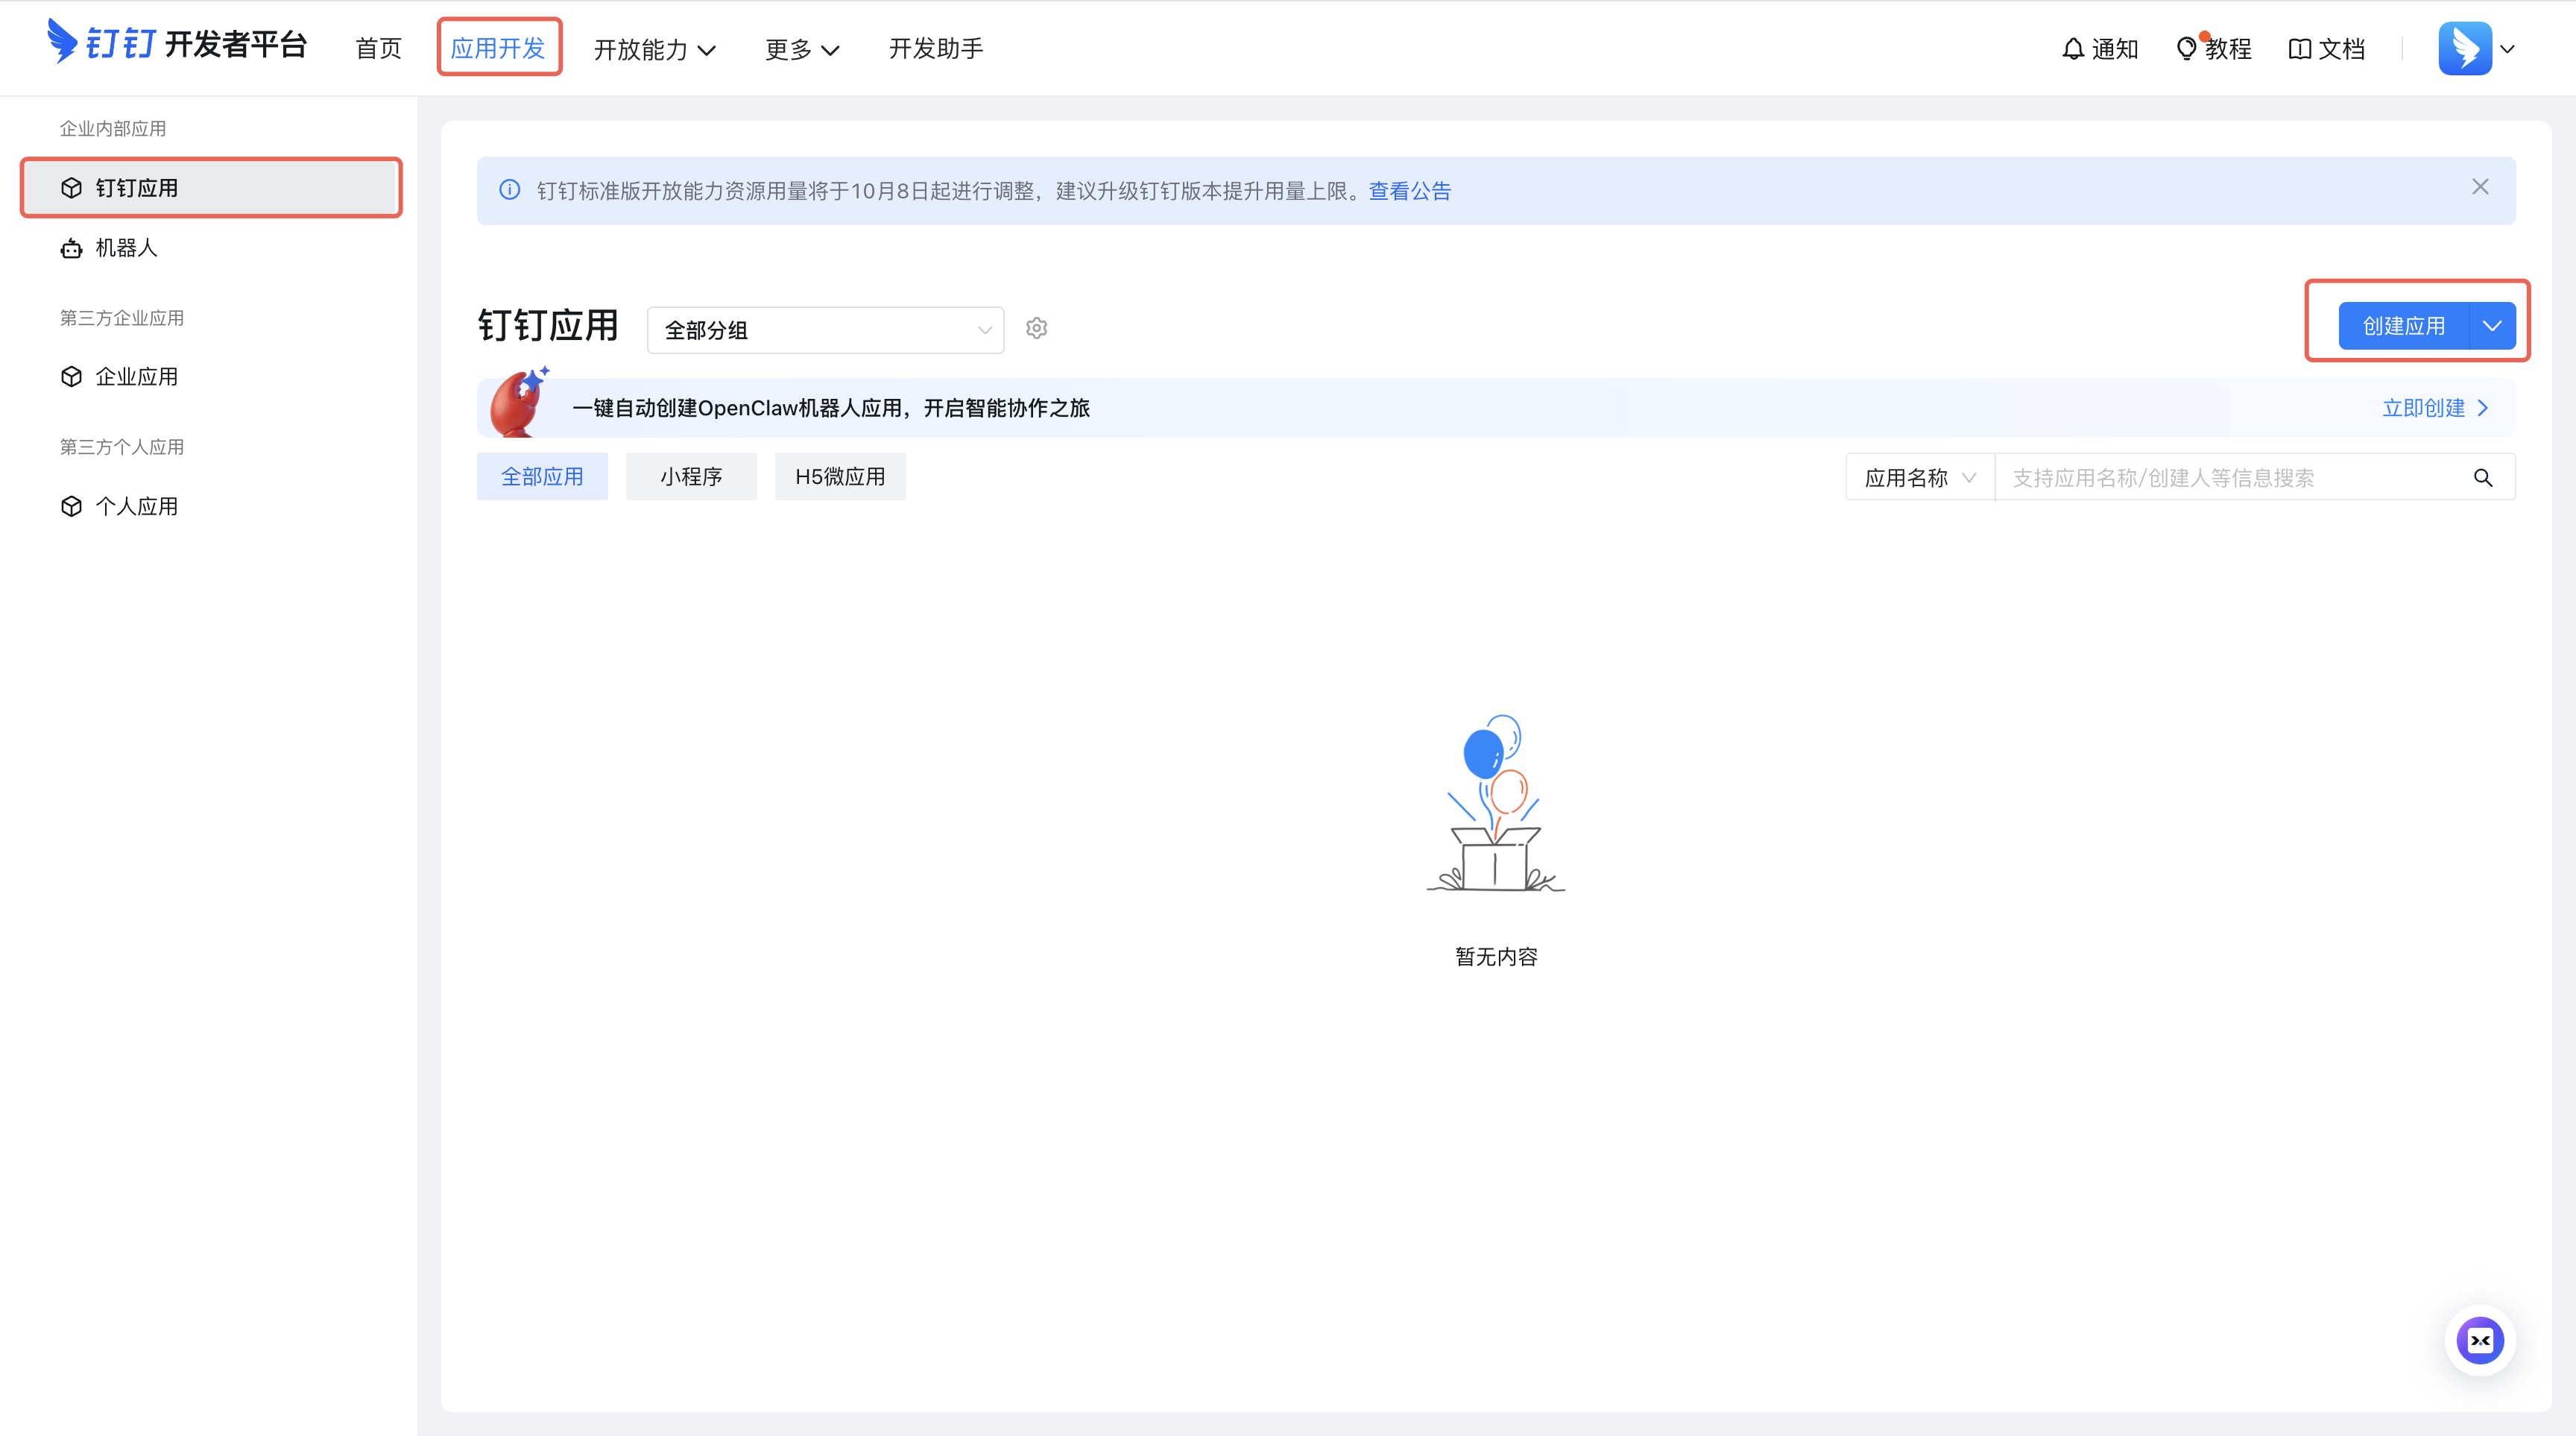
2Create an Application
In the Developer Console, click App Development → Create Application. Fill in the app name (e.g. “QClaw”) and description, then click Save.

3Add Bot Capability
On the Add App Capability page, click Add Bot. Fill in the bot information and click Publish.
4Configure Permissions
In the left menu, click Permission Management. Search for and enable the following three permissions:
Card.Streaming.WriteCard.Instance.Writeqyapi_robot_sendmsg

5Publish the Application
Click Version Management & Publishing in the left menu. Fill in the version number (e.g. 1.0.0) and description. Click Save, then Confirm Publishing. The app must be published before it can be used.

6Copy Client ID and Client Secret
In the left menu, click Credentials & Basic Info. Copy the Client ID and Client Secret.
Step 2: Connect DingTalk to QClaw
7Open QClaw Channel Settings
On your computer, open QClaw. Click Settings → Channels and find DingTalk. Click Configure.

8Enter Client ID and Client Secret
In the DingTalk configuration dialog, enter the DingTalk Client ID and DingTalk Client Secret you copied, then click Connect.

Step 3: Start Using
9Direct Chat
In DingTalk, search for the bot name you created in the top search bar. Click to open the conversation and send a test message (e.g. “Hello”). If configured correctly, QClaw will reply.
10Group Chat (Optional)
Create or select a group chat. Make sure the group’s organization matches the one used when creating the bot. In the group settings, click Bot → Add Bot, select your QClaw bot, and confirm. In the group, @ the bot and send a message to interact.
Troubleshooting
- Bot not responding? — Make sure the DingTalk app has been published and approved. Check that QClaw is running on your computer.
- Can’t find the bot in a group? — Verify the group’s organization matches the bot’s organization. Try restarting DingTalk.
- Permission issues? — Ensure all three required permissions are enabled in Permission Management.
NetEase (163) Email Authorization Guide
Last updated: April 17, 2026
This guide will help you obtain a NetEase email authorization password so that QClaw can connect to your email. This applies to @163.com, @126.com, @188.net, and @yeah.net accounts.
Prerequisites
- QClaw is installed on your computer
- You have a NetEase email account (163, 126, etc.)
Step-by-Step Guide
1Sign in to NetEase Mail
Open your browser and go to https://hw.mail.163.com. Sign in with your NetEase email account.
2Open POP3/SMTP/IMAP Settings
Click Settings in the top navigation bar. In the dropdown menu, click POP3/SMTP/IMAP.

3Enable IMAP/SMTP Service
On the POP3/SMTP/IMAP settings page, you’ll see the service status. Click Enable next to IMAP/SMTP service (or POP3/SMTP service).

A security reminder dialog may appear. Click Continue to proceed.

4Get Your Authorization Password
Once the service is enabled successfully, the system will generate an authorization password (a 16-character uppercase letter code). Copy this password — you’ll need it to connect QClaw.


5Connect to QClaw
Open QClaw and navigate to Connectors → Email. Select NetEase (163) as your email provider. Enter your email address and paste the authorization password you just obtained. Click Connect.
Troubleshooting
- Authorization password not working? — Make sure IMAP/SMTP service is still enabled. Generate a new authorization password if needed.
- Connection failed? — Double-check that you copied the full 16-character authorization password without extra spaces.
- Need server details? — POP3:
pop.163.com| SMTP:smtp.163.com| IMAP:imap.163.com(all support SSL).
QQ Mail Authorization Guide
Last updated: May 12, 2026
This guide will help you obtain a QQ Mail authorization code so that QClaw can connect to your QQ email account.
Prerequisites
- QClaw is installed on your computer
- You have a QQ Mail account
- Your QQ account must have a phone number bound (required to enable the service)
Step-by-Step Guide
1 Sign in to QQ Mail
Open your browser and go to https://mail.qq.com. Sign in with your QQ account.
2 Go to Security Settings
On the PC web version, click your avatar in the top-right corner. Navigate to Settings → Account & Security → Security Settings. Scroll down to find the POP3/IMAP/SMTP/Exchange/CardDAV service section.
Note: You must bind a phone number to your QQ account before you can enable this service. If you see a prompt to bind your phone first, follow the instructions to complete it.
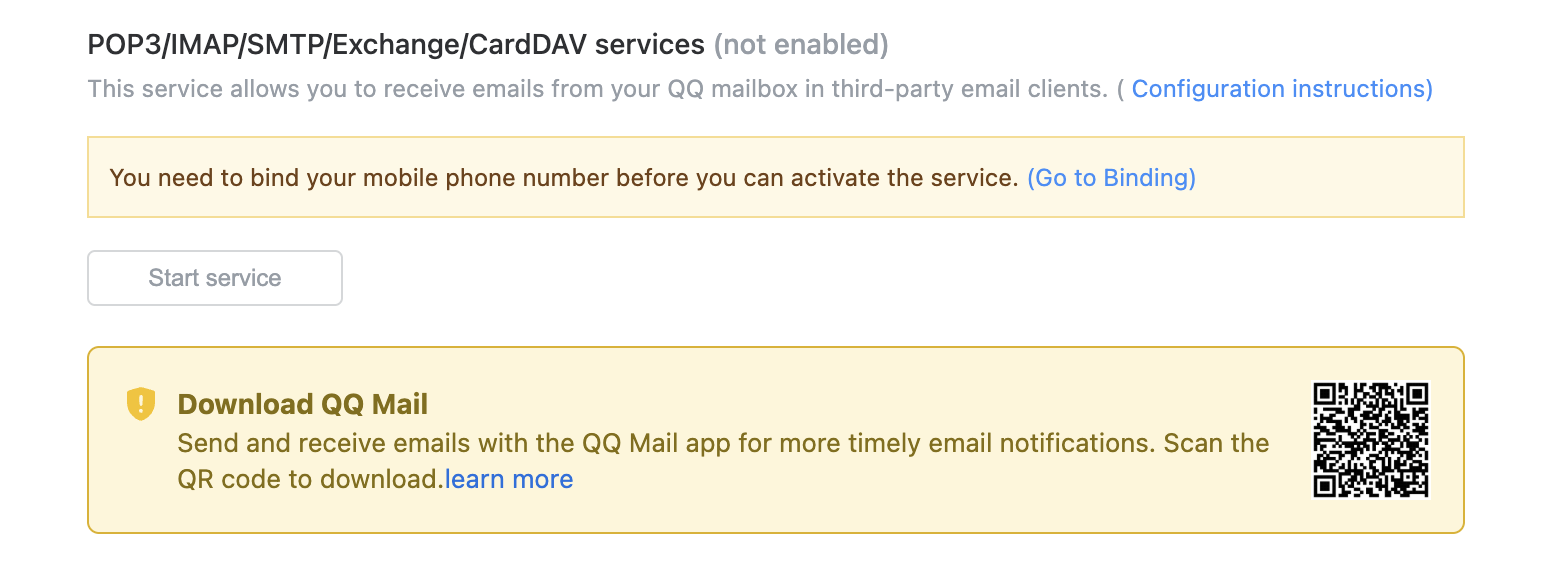
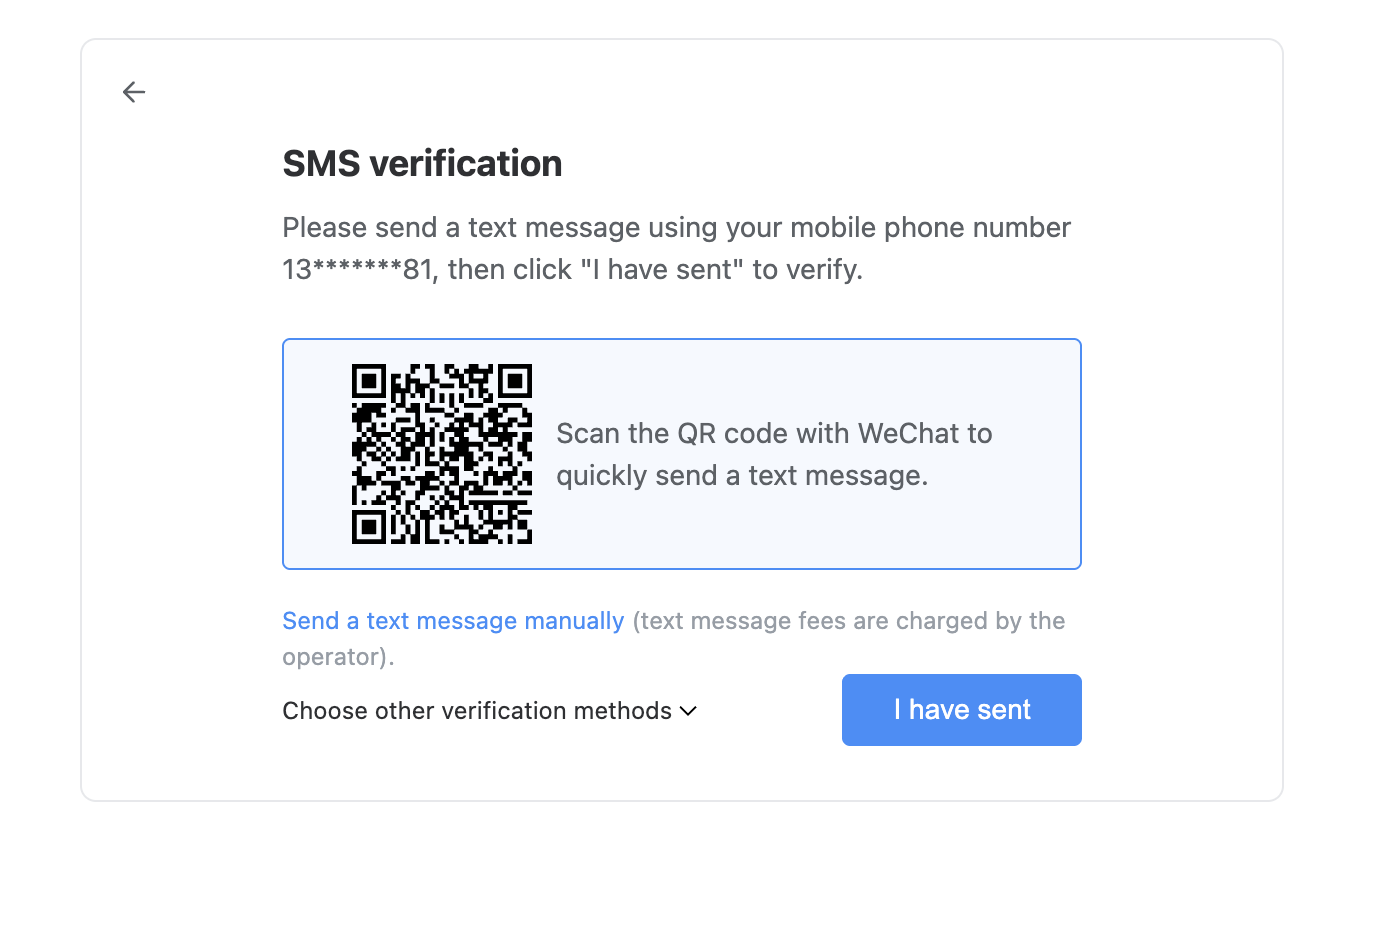
3 Enable the Service
Click the Start Service button. A verification prompt will appear — complete the SMS verification by following the on-screen instructions.
4 Get Your Authorization Code
After successful verification, the system will generate a 16-character authorization code. You can optionally note the purpose as “QClaw” in the label field. Copy this code.
Important: Keep this authorization code safe. For security, do not share it with others. If you lose it, you can create a new one.
5 Connect to QClaw
Open QClaw and navigate to Connectors → Email. Select QQ Mail as your email provider. Enter your QQ email address and paste the authorization code, then click Connect.
Troubleshooting
- Can’t enable the service? — Make sure your QQ account has a phone number bound.
- Authorization code not working? — Generate a new code by going back to Security Settings and clicking Enable Service again.
- Connection failed? — Double-check the 16-character code was copied without extra spaces.
Sina Email Authorization Guide
Last updated: May 13, 2026
This guide will help you obtain a Sina email authorization code so that QClaw can connect to your email. Once connected, QClaw can assist you in processing emails and smartly categorizing your inbox, keeping important communications clear while filtering out invalid information.
Prerequisites
- QClaw is installed on your computer
- You have a Sina email account
Step-by-Step Guide
1 Sign in to Sina Mail
Open your browser and go to https://mail.sina.com.cn/?from=mail#. Sign in with your Sina email account.
2 Open POP/IMAP/SMTP Settings
Click Settings in the top right corner of the page. Navigate to the Client-side POP/IMAP/SMTP tab.
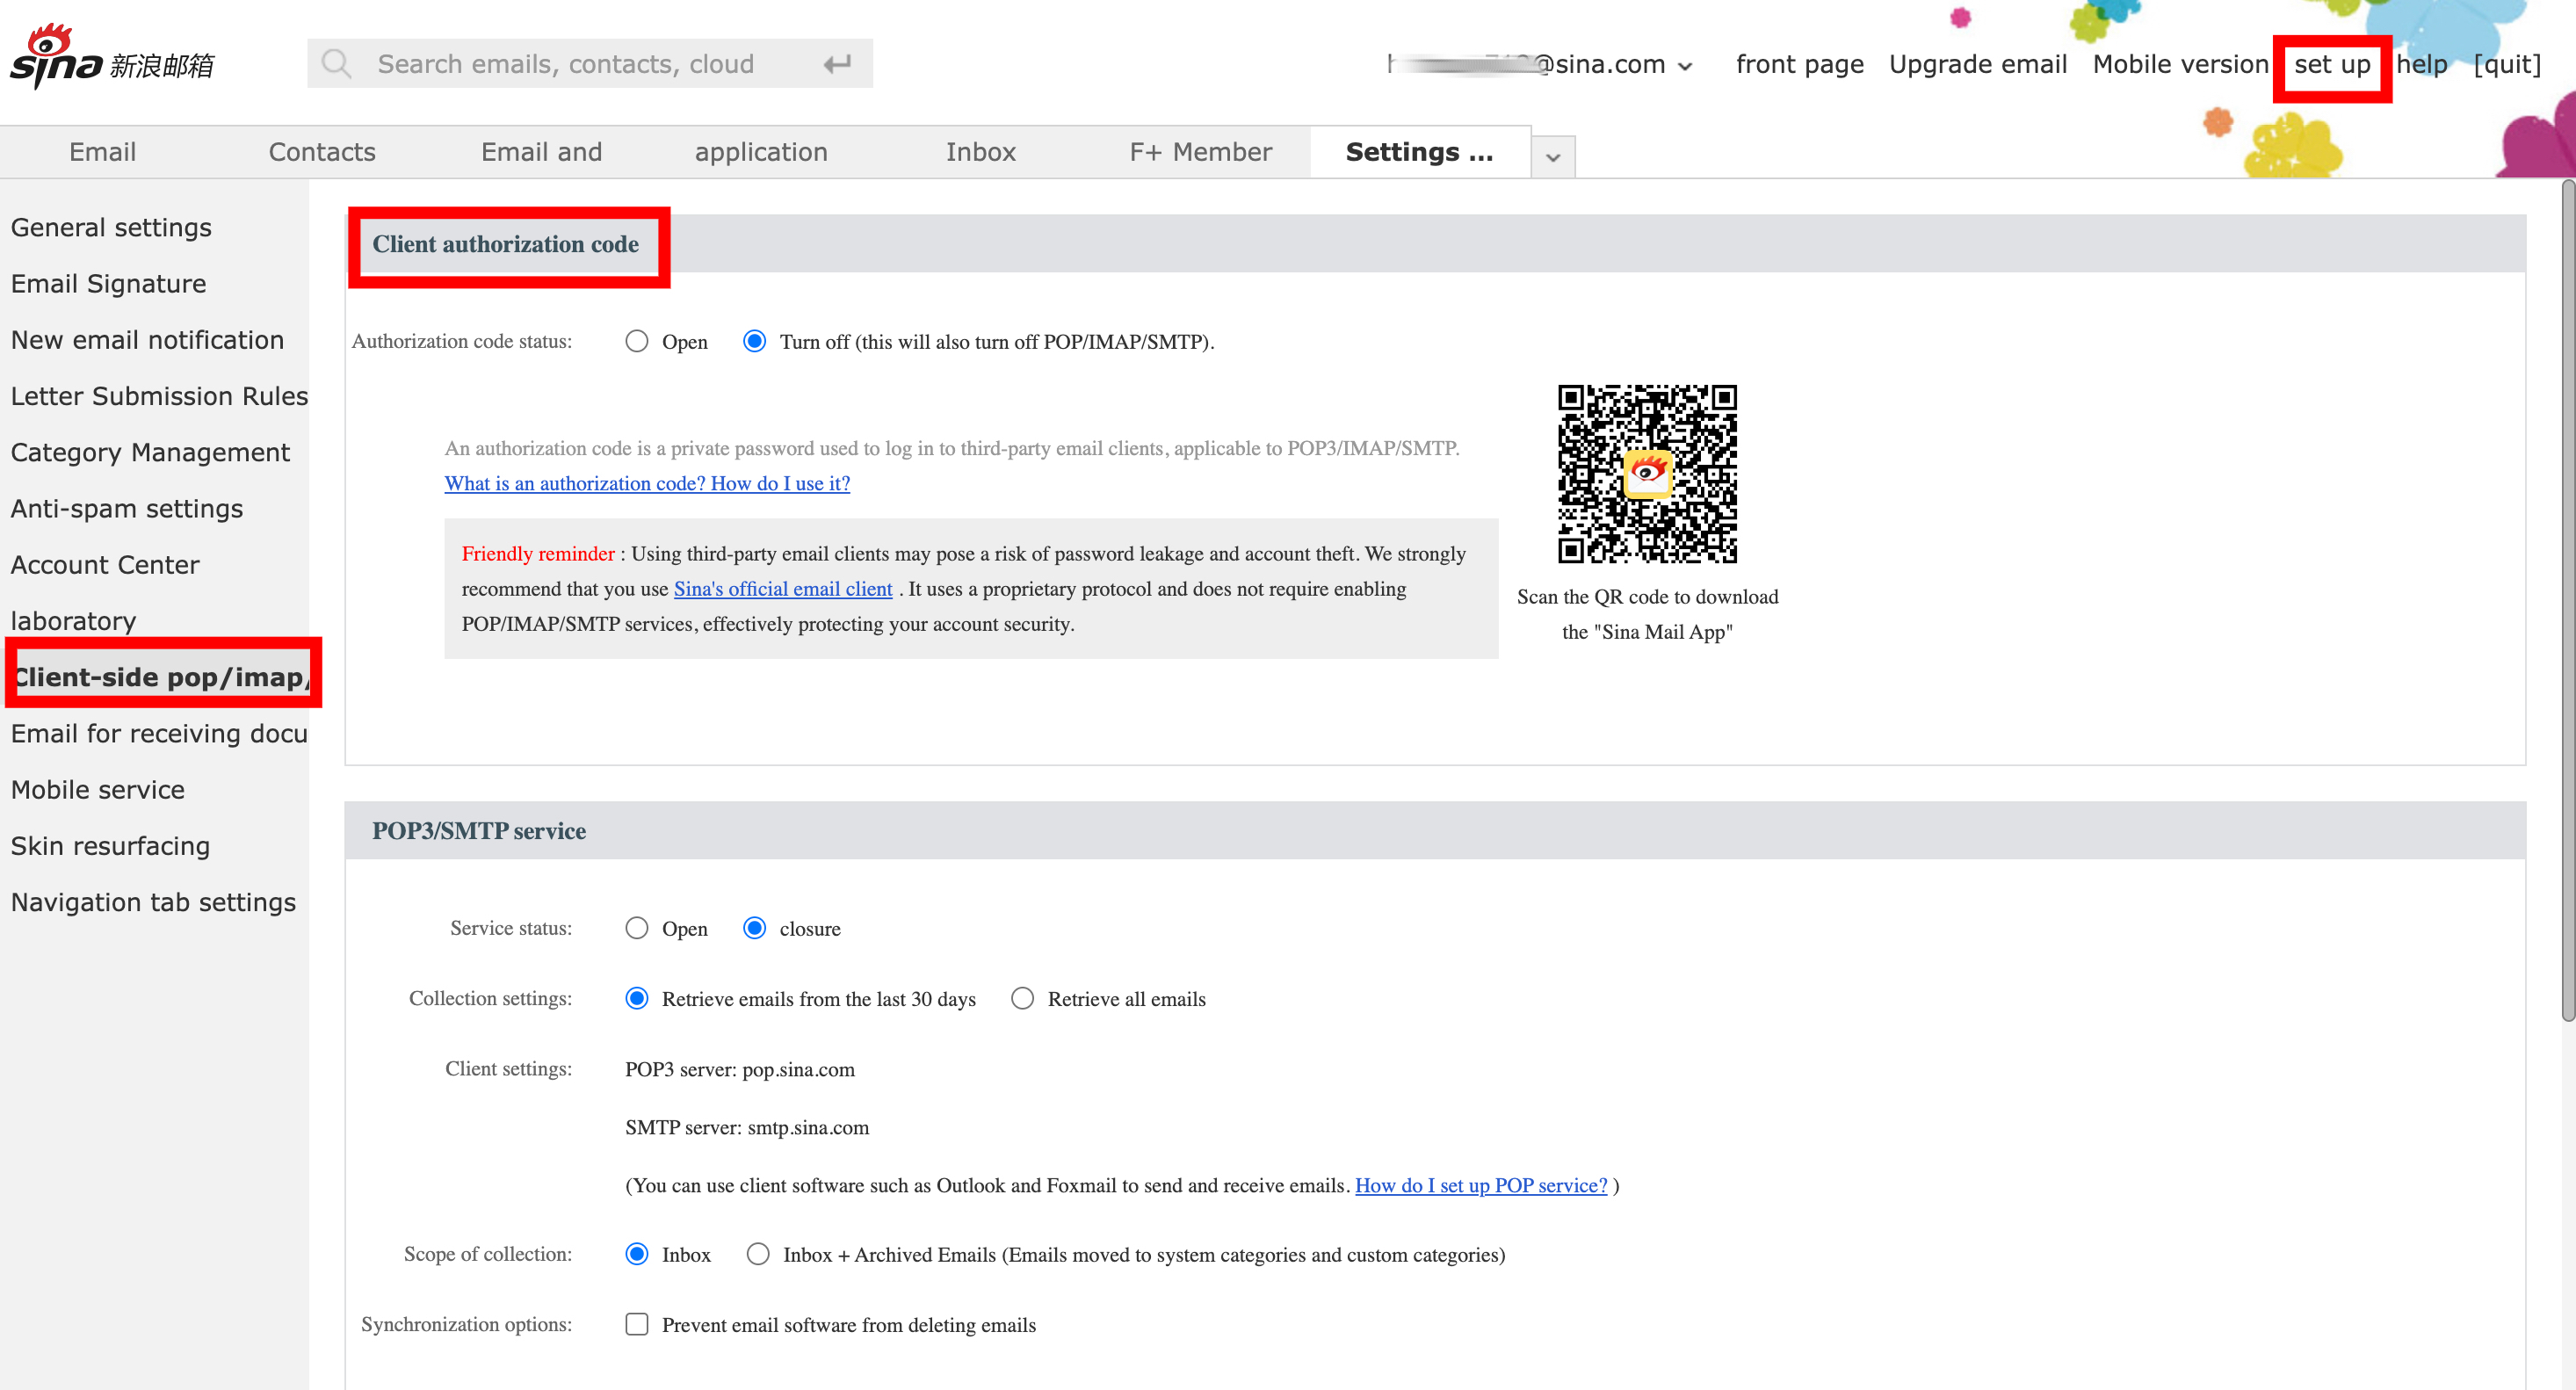
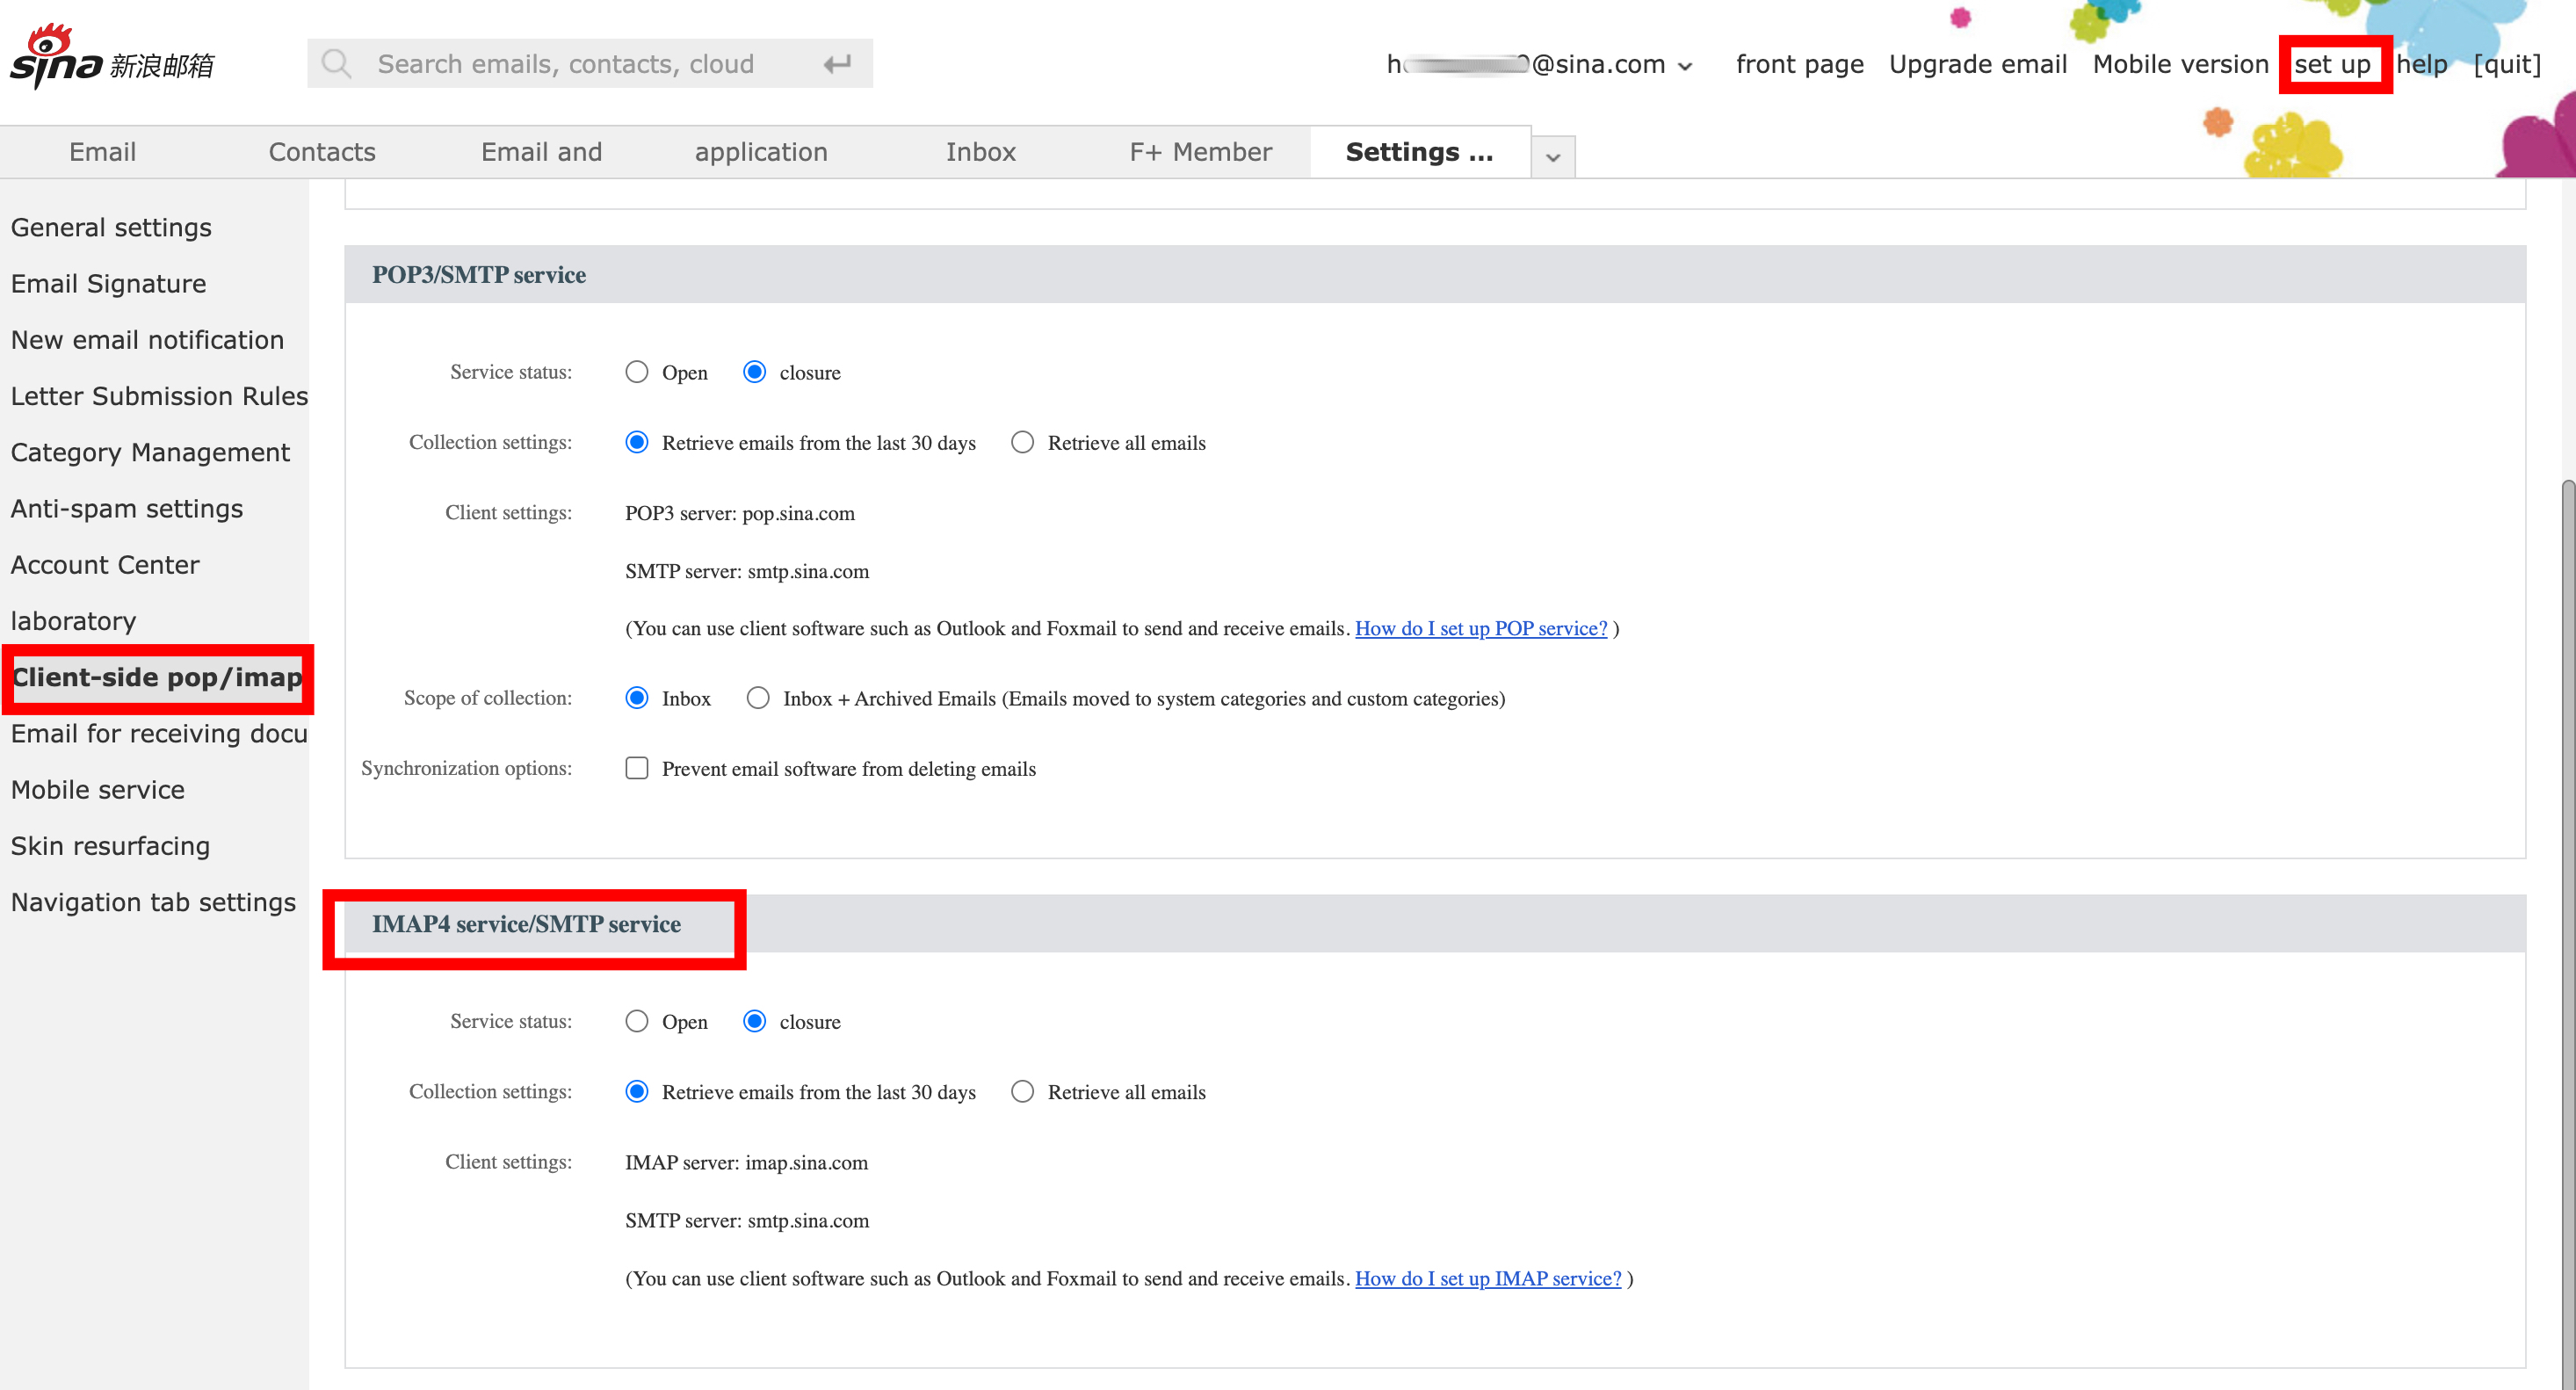
3 Enable IMAP4/SMTP Service & Verify
Under the "IMAP4 service/SMTP service" section, set the service status to Enable.
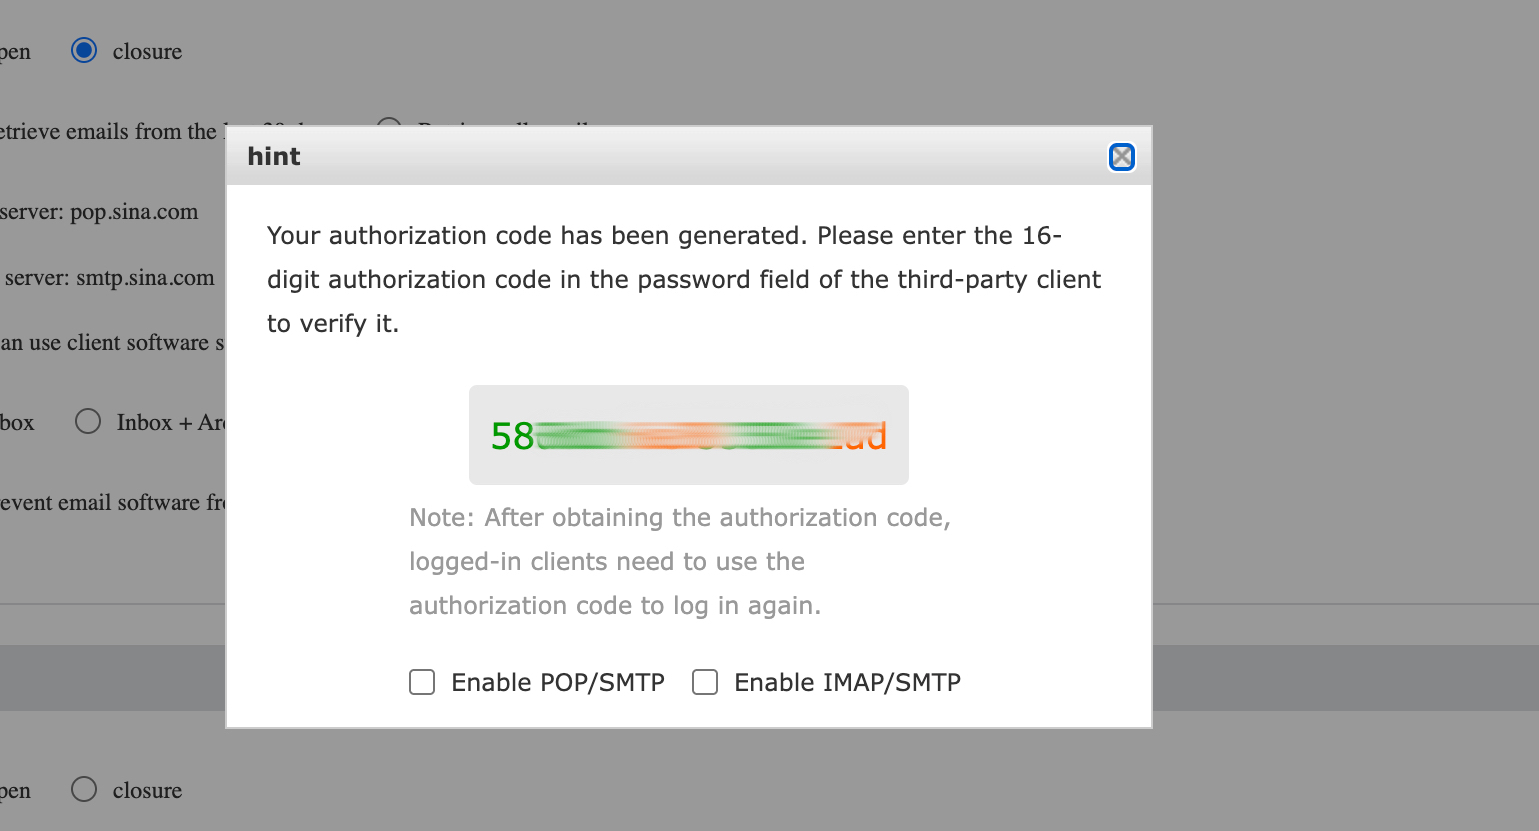
When enabling the service, the system will require security verification. Follow the prompts to enter the mobile phone number linked to your account, input the SMS verification code you receive, and click OK.

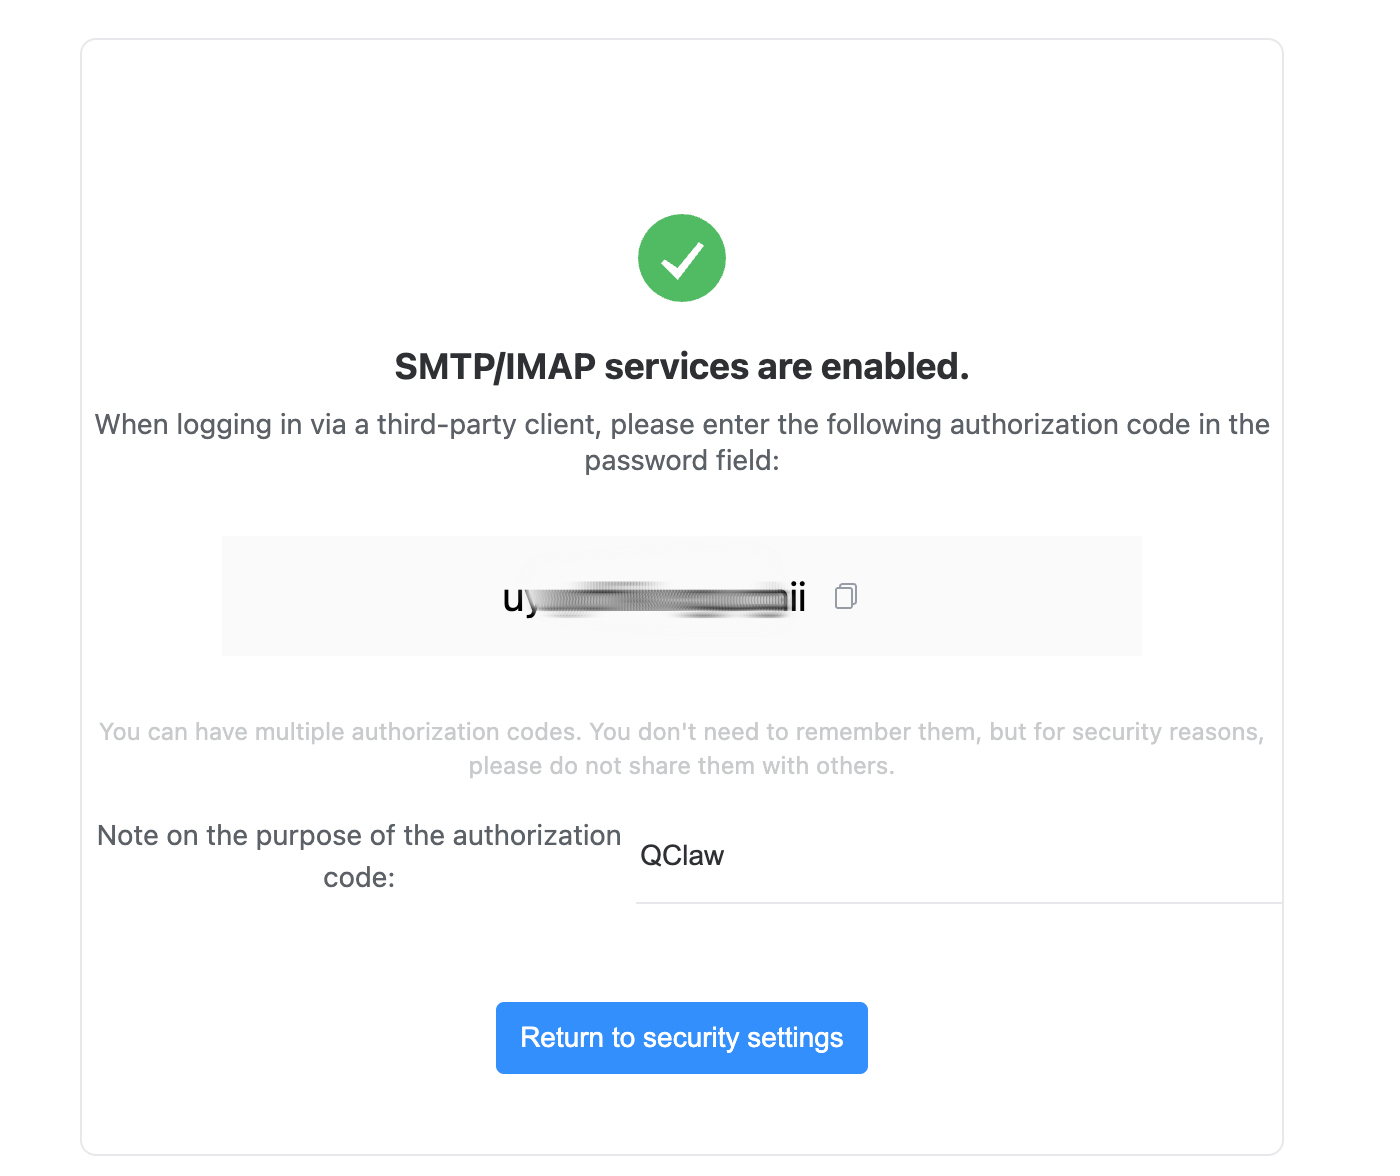
4 Get Your Authorization Code
Once the verification is successful, a pop-up window will display a 16-character authorization code. Copy this code — you’ll need it to connect QClaw.
Important: Keep this authorization code safe. For security, do not share it with others. If you lose it, you can create a new one.
5 Connect to QClaw
Open QClaw and navigate to Connectors → Email. Select Sina as your email provider. Enter your email address and paste the authorization code you just obtained. Click Connect.
Troubleshooting
- Authorization password not working? — Make sure IMAP/SMTP service is still enabled. Generate a new authorization password if needed.
- Connection failed? — Double-check that you copied the full 16-character authorization password without extra spaces.
Outlook App Password Guide
Last updated: April 17, 2026
This guide will help you generate an Outlook App Password so that QClaw can connect to your Outlook / Hotmail / Live email account. App Passwords require Two-Factor Authentication (2FA) to be enabled first.
Prerequisites
- QClaw is installed on your computer
- You have a Microsoft Outlook / Hotmail / Live email account
Step-by-Step Guide
1Open Microsoft Security Settings
Go to https://account.live.com/proofs/Manage/ and sign in with your Microsoft account. You’ll see the Security page with your sign-in methods and security options.

2Enable Two-Factor Authentication
If Two-Factor Authentication is already enabled, skip to Step 3.
Under Other security options, find Two-factor authentication. If it shows Off, click Enable. On the setup page, click Next and follow the prompts to complete the verification.

3Create an App Password
Once Two-Factor Authentication is enabled, go back to the Security settings page. Find the App passwords section and click Create a new app password. Microsoft will generate a unique password. Copy it immediately.
4Connect to QClaw
Open QClaw and navigate to Connectors → Email. Select Outlook as your email provider. Enter your Outlook email address and paste the App Password you just generated. Click Connect.
Troubleshooting
- App Password option not available? — Make sure Two-Factor Authentication is fully enabled. It may take a few minutes to propagate.
- Connection failed? — Double-check you copied the full app password without extra spaces. Try generating a new one if it persists.
- Using a work/school account? — Your organization admin may need to allow app passwords. Contact your IT department.
Gmail App Password Guide
Last updated: April 17, 2026
This guide will help you generate a Google App Password for your Gmail account so that QClaw can connect to your email. Once connected, QClaw can help you organize, search, and manage your emails automatically.
Prerequisites
- QClaw is installed on your computer
- You have a personal Google / Gmail account
Step-by-Step Guide
1Sign in to Gmail
Open your browser and go to https://mail.google.com. Sign in with the Google account you want to connect to QClaw.
2Enable 2-Step Verification
If you already have 2-Step Verification enabled, skip to Step 3.
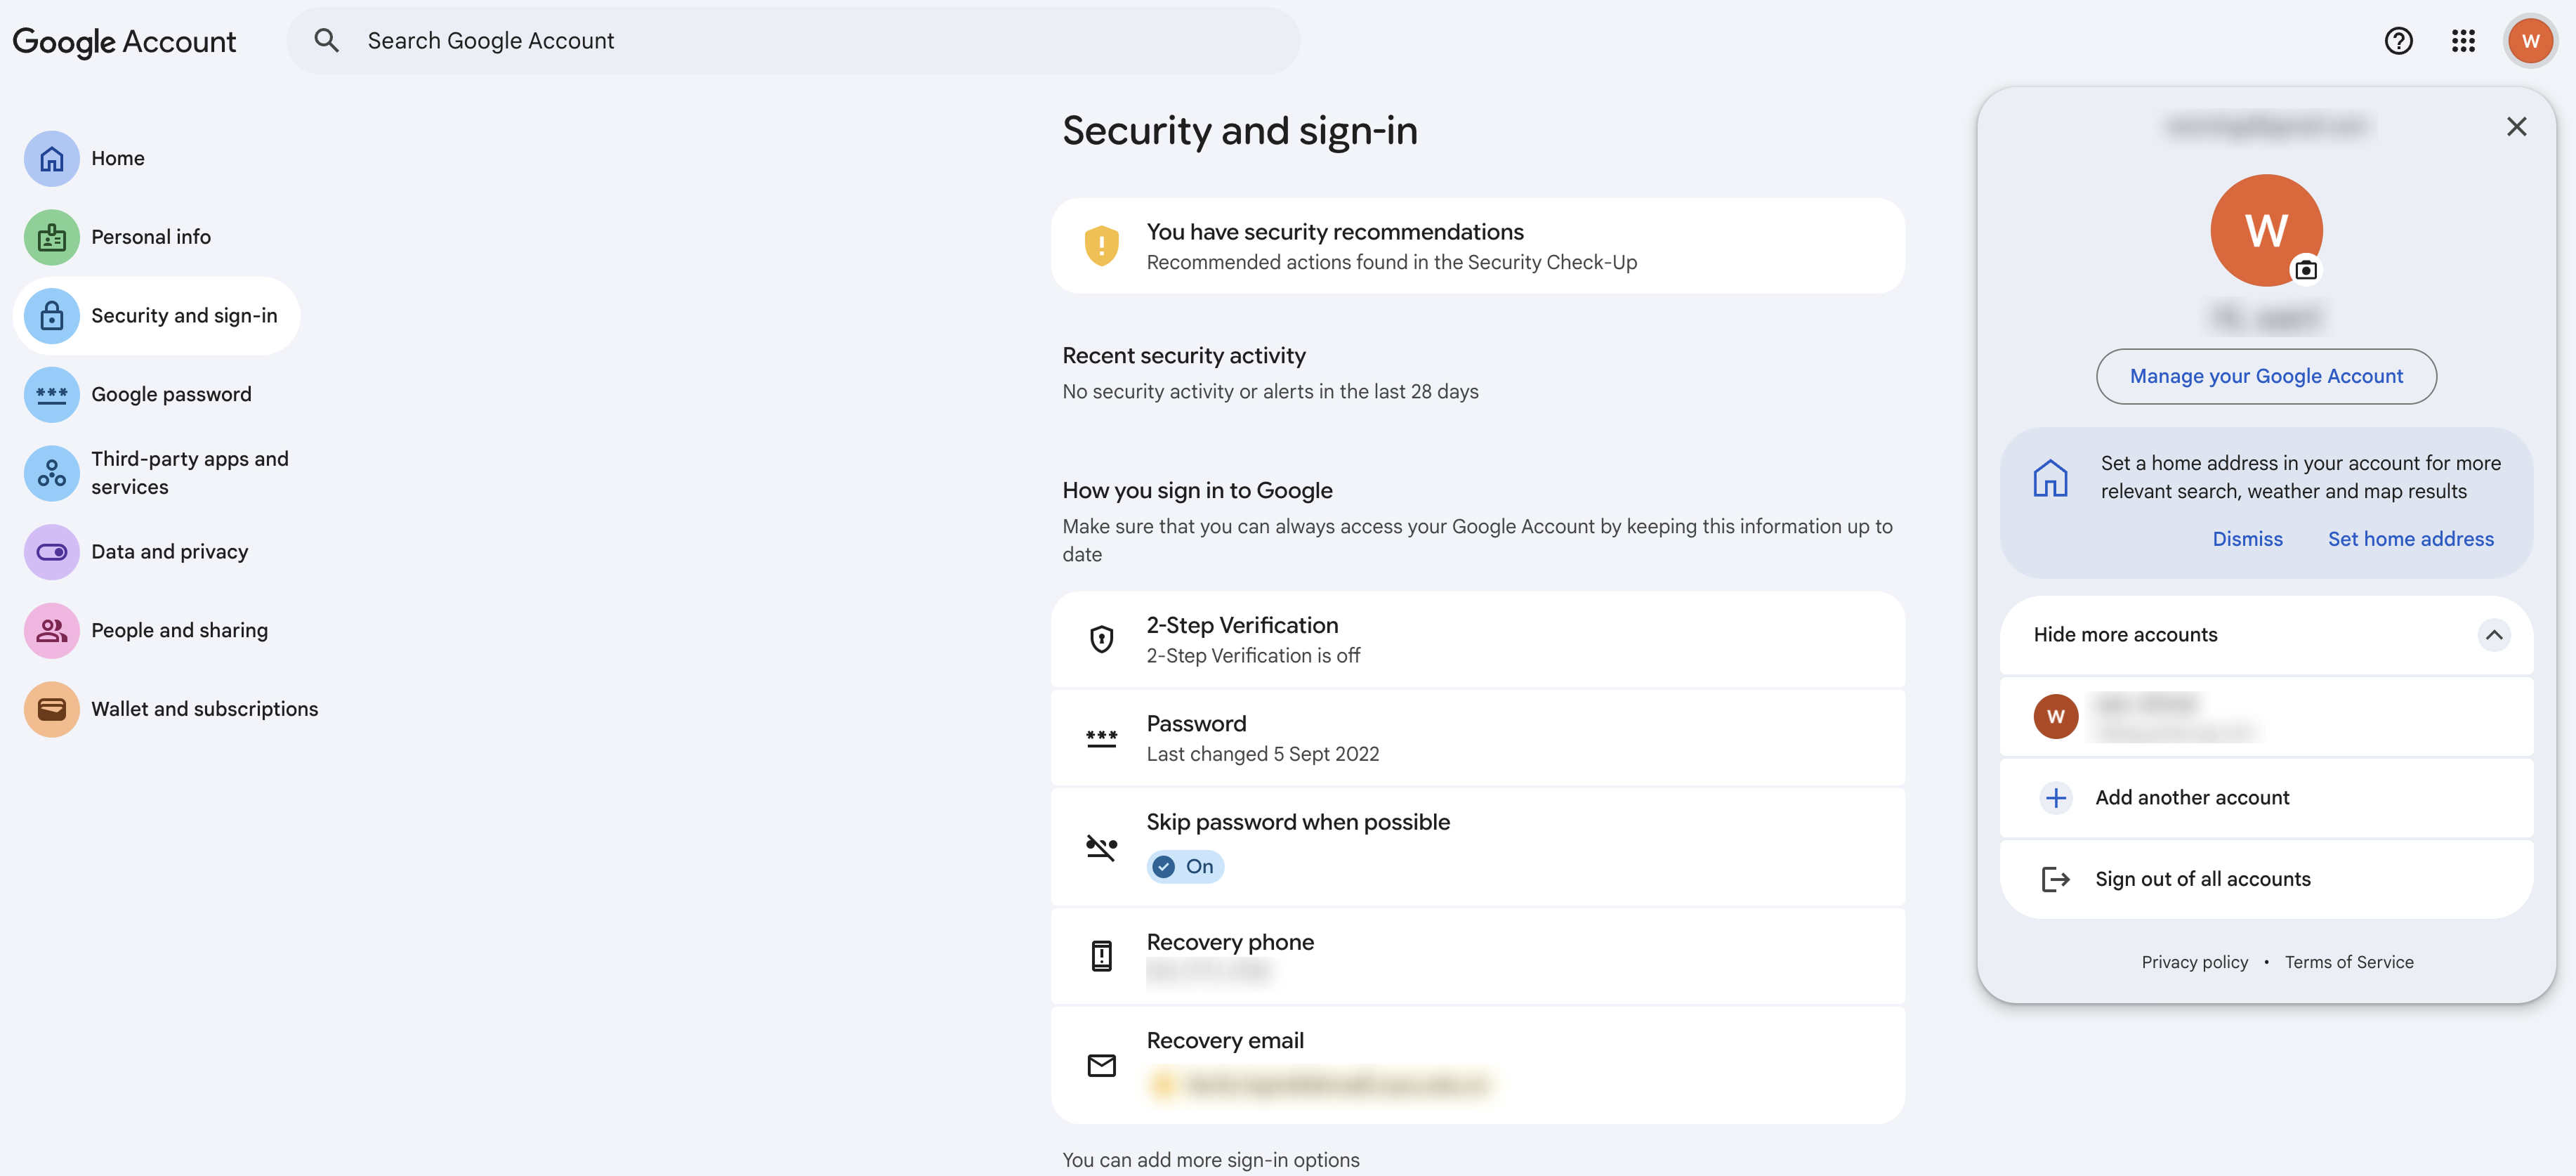
- Go to your Google Account security settings:
https://myaccount.google.com/security - Under “How you sign in to Google”, find 2-Step Verification and click on it.
- Click “Turn on 2-Step Verification” and follow the prompts to verify your identity.
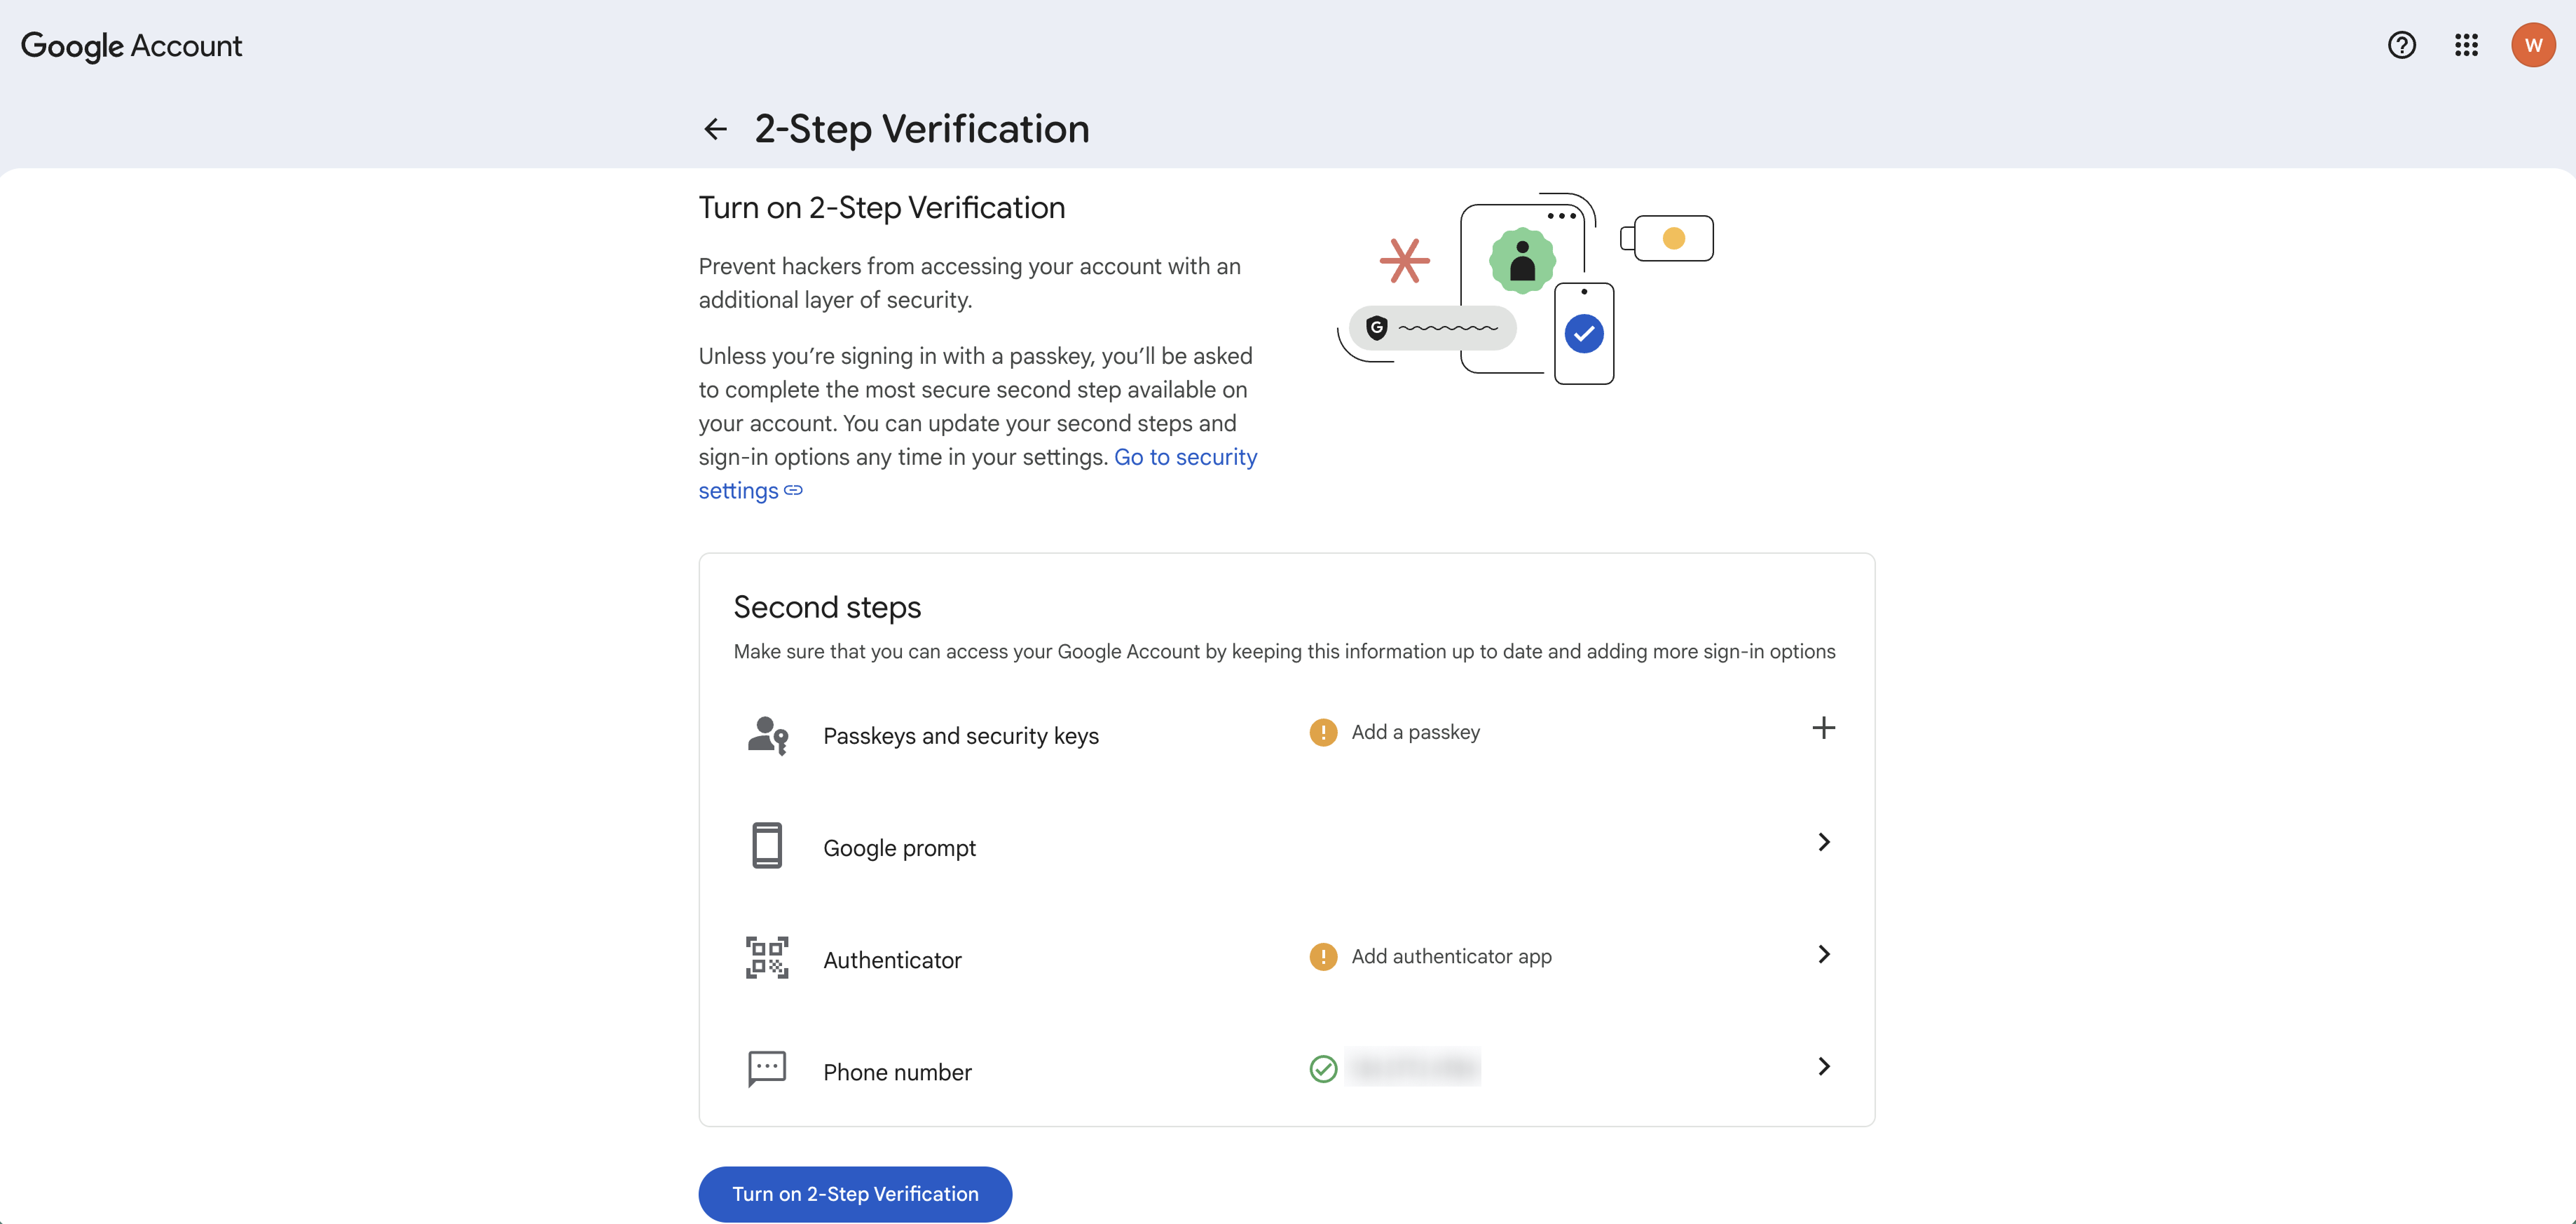
- Once completed, you’ll see a confirmation that 2-Step Verification is now enabled.

3Generate an App Password
- Go back to your Google Account settings and search for “App passwords” in the search bar, then click the result.

- In the “App name” field, type
QClawand click “Create”.
- Google will generate a 16-character App Password. Copy this password.
4Connect to QClaw
- Open QClaw and navigate to Connectors → Email.
- Select Gmail as your email provider.
- Enter your Gmail address and paste the 16-character App Password you just generated.
- Click “Connect” — you’re all set!
Troubleshooting
- “App Passwords” option not showing up? — Make sure 2-Step Verification is fully enabled. It may take a few minutes to propagate.
- Connection failed? — Double-check that you copied the full 16-character password without extra spaces. Try generating a new App Password if the issue persists.
- Using a Google Workspace account? — Your organization administrator may need to enable “Less secure app access” or allow App Passwords in the admin console.